The Schwarzenegger - Developer Guide
By: CS2113T-F11-1 Since: 2020


Table of Contents
- Introduction
1.1. Background
1.2. Purpose
1.3. Scope - Setting Up
2.1. Prerequisites
2.2. Setting up the Project in Your Computer - Design
3.1. Architecture
3.2. Ui Component
3.3. Logic Component
3.4. Model Component
3.5. Storage Component
3.5.1. Storage for Profile
3.5.2. Storage for Diet
3.5.3. Storage for Workout - Implementation
4.1. Main Menu-related Features
4.2. Profile-related Features
4.2.1. Adding a Profile
4.2.2. Viewing a Profile
4.2.3. Editing a Profile
4.2.4. Deleting a Profile
4.3. Diet-related Features
4.3.1. List Out All Commands
4.3.2. Start Recording Diet Data
4.3.2.1. Showing Help Message
4.3.2.2. Adding Food Items for the Current Diet
4.3.2.3. Listing Data for the Current Diet
4.3.2.4. Deleting Data from the Current Diet
4.3.2.5. Clearing Data from the Current Diet
4.3.2.6. Stopping the Recording of Diet Data
4.3.3. List All Past Diet Sessions
4.3.4. Edit a Past Diet Session
4.3.5. Delete a Past Diet Session
4.3.6. Clear all Past Diet Sessions
4.3.7. Search for Past Diet Sessions
4.3.8. Exit the Diet Manager
4.4. Workout-related Features
4.4.1. Creating a New Workout Session
4.4.1.1. Adding an Exercise
4.4.1.2. Deleting an Exercise
4.4.1.3. Listing All Exercises in This Session
4.4.1.4. Searching for Related Exercises
4.4.2. Listing Past Workout Sessions
4.4.3. Editing Workout Session
4.4.4. Deleting a Workout Session
4.4.5. Searching Based on Conditions
4.5. Logging - Testing
5.1. Running Tests
5.2. Types of Tests - Dev Ops
6.1. Build Automation
6.2. Continuous Integration
6.3. Coverage Report
6.4. Making a Release
6.5. Managing Dependencies
1. Introduction
1.1. Background
The Schwarzenegger is a desktop command line interface-based app for managing all your needs regarding fitness. With the built-in personal assistant, you are able to track your daily workout and diet sessions based on your profile. If you can type fast, The Schwarzenegger can help you maximise your efficiency for maintaining fitness.
1.2. Purpose
This document contains the specified architecture and software design specifications for the application, The Schwarzenegger.
1.3. Scope
This document describes the software architecture and software design requirements for The Schwarzenegger. This guide is mainly for developers, designers and software engineers that are or going to work on The Schwarzenegger.
2. Setting Up
2.1. Prerequisites
- JDK
11. - IntelliJ IDEA IDE.
2.2. Setting up the Project in Your Computer
- Fork this repository, and clone the fork to your computer.
- Open IntelliJ (if you are not in the welcome screen, click
File>Close Projectto close the existing project dialog first). - Set up the correct JDK version for Gradle
- Click
Configure>Structure for New Projectsand thenProject Settings>Project>Project SDK. - If
JDK 11is listed in the drop down, select it. Otherwise, clickNew…and select the directory where you installedJDK 11. - Click
OK.
- Click
- Click
Import Project. - Locate the
build.gradlefile and select it. ClickOK. - Click
Open as Project. - Click
OKto accept the default settings if prompted.
3. Design
This section provides a high level overview of our application, The Schwarzenegger.
3.1. Architecture

The image above explains the design of the application, The Schwarzenegger.
The main driver of the application is Main: Duke. It is responsible for mainly two phases:
- At application launch
- This class will initialise the components in the correct sequence and is in charge of connecting them with each other.
- At shut down
- This class will invoke cleanup method for the components when necessary.
In addition to that, the architecture of The Schwarzenegger is broken down into several packages, mainly the following:
Ui: This class mainly handles the interactions with user of the application.Parser: This class mainly handles the parsing and handling of user commands.Command: This class handles the type of command.Profile: This class manages the data of the user.Diet: This class manages the diet recording sessions.Workout: This class manages the data workout recording sessions.Storage: This class reads data from and writes data back into a text file for future uses.
3.2. Ui Component

The Ui package is a combination class where the interactions with the user are formatted in a consistent way.
The Ui component,
- Takes in user commands
- Formats messages and prints out responses
3.3. Logic Component
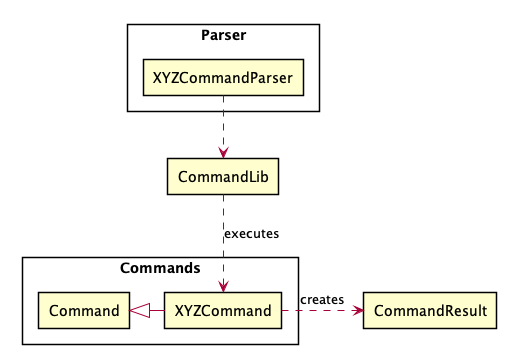
The SchwarzeneggerusesParserclasses to parse the user command.- This splits the user input into interpretable portions by other functions.
- All commands inherits from base class Command with an
execute()method. They are stored in a hashmapCommandLiband retrieved using user’s input as key. - Command interacts with parsers, models and storage to carry out the user’s command.
- The result of the command execution is encapsulated as a CommandResult object which is passed back to CommonUi to display the message.
3.4. Model Component

The Model component contains Profile, DietManager,
PastRecord and WorkoutSession classes.
- Profile: Stores the user profile data.
- Food: Stores food data that user consumes in a meal.
- PastRecord: Stores meta information of each WorkoutSession files.
- Exercises: Stores the exercise data done in each workout session.
3.5. Storage Component
Storage in the application refers to storing files of user profile and workout, diet sessions into respective local subdirectories sorted based on time in a local directory called /saves which is in the same directory as the project root.
3.5.1. Storage for Profile
Storage for profile saves user profile created as profile.json in the /saves/profile directory. Profile data file is created as follows:
profile.jsonis updated in the local hard disk after the user adds/ edits a profile by callingProfileAdd.execute()/ProfileEdit.execute().profile.jsoncontent will be cleared after the user deletes a profile by callingProfileDelete.execute().
Implementation
Profile workoutSessionStorage handles reading of file data by calling loadData() and overwriting of file data by calling saveData().
3.5.2. Storage for Diet
Storage for diet saves diet sessions created as individual files sorted based on the time created in the /saves/diet directory. Each diet session file is created as follows:
- Each file is created as a json file and named as
[DATE] [TAG].json. - A corresponding file is updated in the local file after the user enters a command into a diet session by calling DietSessionEdit.execute(), or DietSessionCreate.execute().
- A corresponding file is deleted in the local file when the user deletes a diet session by calling DietSessionDelete.execute() or clears all diet sessions by calling DietSessionClear.execute().
Implementation Storage handles reading of file data by calling readDietSession() and overwriting of file data by calling writeToStorageDietSession().
3.5.3. Storage for Workout
Storage for workout saves workout sessions created as individual files named based on the time created in /saves/workout directory. The metainformation of the files such as createion date and last edit date is saved in /saves/workout/history.json.
Only history.json file is load when initilizing the application. The rest of Session files are load on request, e.g. edit. When a new workout session is created, a new file will be stored and its meta information will be appended to history.json. When a workout session is deleted, the file will be removed and its record will be removed from history.json.
4. Implementation
This section describes some details on how the features are being implemented. All profile/ diet/ workout-related features.
All profile/ diet/ workout-related features can be broken down into 4 distinct functionality, addition, viewing/ listing, deletion and editing. For diet and workout-related features, there is an additional functionality of searching.
4.1. Main Menu-related Features
This feature allows user to access the different menu for workout, diet and profile. The failure to do so will trigger an exception where the user will be notified of the reason, e.g. invalid command. The action will be aborted, and the program will advise the user to type “help” for command syntax reference.
If the command is successful,the user will be put into the respective menu and a starting message on the entered menu will be displayed to the user.
Implementation
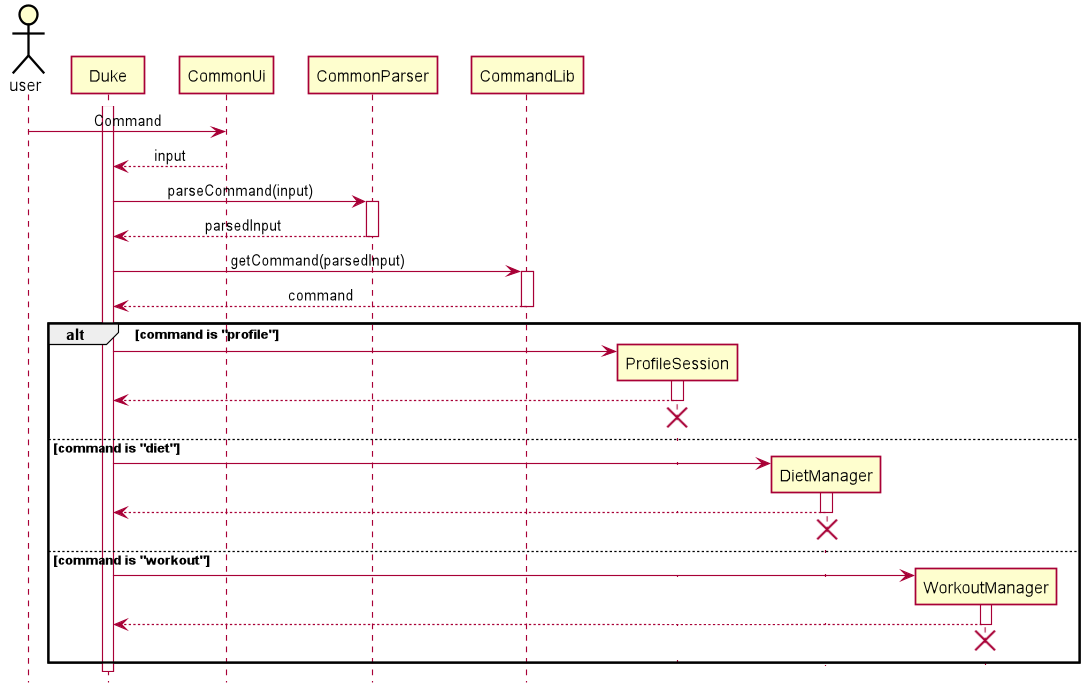
When the user attempts to access different menu for workout, diet and profile menu, the Duke, CommonUi, CommonParser and CommandLib classes will be accessed, and the following sequence of actions is called to prompt execution result to user:
- User executes a command
DukecallsCommonUi.getCommand()to receive user input.DukecallsCommonParser.parseCommand()to parse user input into a string array.
DukecallsCommandLib.getCommandwith the string arry containing the inputs.- Depending on the input,
DukecreatesProfileSessionorDietManagerorWorkoutManagerobject. - After entering the
ProfileSessionorDietManagerorWorkoutManagerobjects, the menus will have their own separate tasks.
The sequence diagram below summarizes how Main Menu works:
4.2. Profile-related Features
4.2.1. Adding a Profile
This feature allows user to add a new profile. The failure to do so will trigger an exception where the user will be notified of the reason, e.g. invalid command format. The action will be aborted, and the program will advise the user to type “help” for command syntax reference.
If the creation is successful, a confirmation message on the newly created profile will be displayed to the user.
Implementation
When the user attempts to add a new profile, the ProfileSession, CommonUi, ProfileParser, Command, CommandLib, ProfileStorage, Profile and CommandResult classes will be accessed, and the following sequence of actions is called to prompt execution result to user:
- User executes
add /n Schwarzenegger /h 188 /w 113 /e 100 /c 2500ProfileSessioncallsCommonUi.getCommand()to receive user input.ProfileSessioncallsProfileParser.parseCommand()to parse user input into a string array.
- Creating
ProfileAddobject.- Based on the parsed input,
ProfileSessioncallsCommandLibto return the correct Command ObjectProfileAdd.
- Based on the parsed input,
- Executing command.
ProfileSessioncallsProfileAdd.execute()with the rest of parsed input.ProfileAddcallsProfileStorage.loadData()to load existing profile in the system. If there is an existing profile,ProfileAddreturns a failure result toProfileSession. Otherwise, the process continues with step3.ProfileAddcallsProfileParser.extractCommandTagAndInfo()to parse user input into specific tags and information.- Based on the parsed information from
ProfileParser.extractCommandTagAndInfo(),ProfileAddcreates a newProfile. ProfileAddcallsProfileStorage.saveData()to save theProfileobject.ProfileAddreturns a successful result toProfileSession.
- Prompting result to user.
ProfileSessioncallsCommandResult.getFeedbackMessage()to get the execution feedback message.ProfileSessioncallsCommonUi.showToUser()to show result to the user.
All descriptions, warnings and responses will be handled by CommonUi to ensure consistence across the app.
The sequence diagram below summarizes how creating a new profile works:
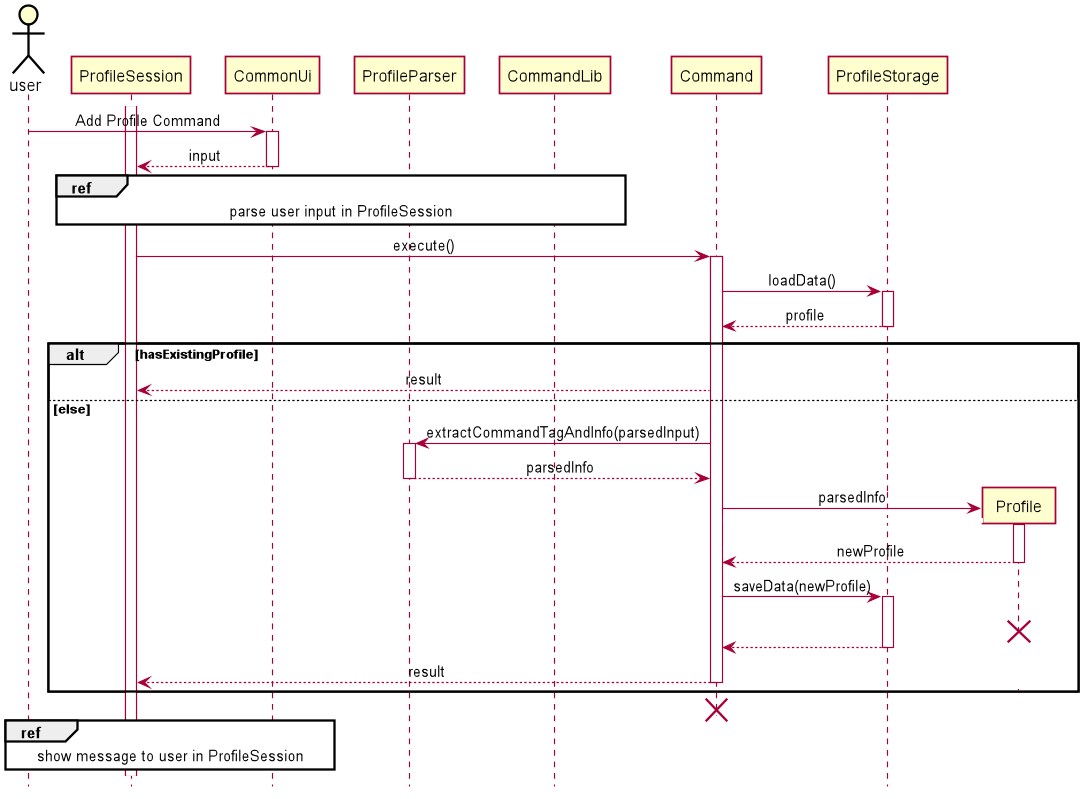
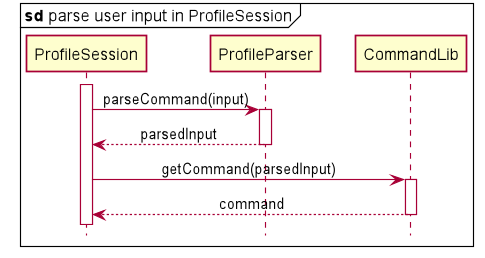
Figure 4.2.1. Sub-diagram for Parsing Input in ProfileSession
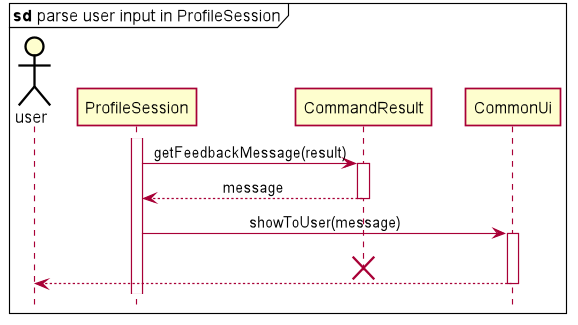
Figure 4.2.2. Sub-diagram for Showing Message to User in ProfileSession
Design considerations
Parsing of the user’s input command:
-
Alternative 1 (current choice): User’s command is split into size 2 array first containing command type and command arguments. Then arguments are split into command tag and information pairs.
- Pros: Command tags do not have to follow a fixed order.
- Cons: It takes multiple steps in parsing the command.
-
Alternative 2: User’s command is divided by space.
- Pros: The parsing can be easily done by calling Java built-in function
split(). Supports multiple tags or no tags. - Cons: Values for each variable cannot contain spaces which makes the application restrictive, especially for user’s name.
- Pros: The parsing can be easily done by calling Java built-in function
4.2.2. Viewing a Profile
This feature allows user to view added profile with calculated BMI based on height and weight. The failure to do so will trigger an exception where the user will be notified of the reason, e.g. redundant parameters. The action will be aborted, and the program will advise the user to type “help” for command syntax reference.
If the data loading is successful, a message on the added profile will be displayed to the user.
Implementation
When the user attempts to view an added profile, the ProfileSession, CommonUi, ProfileParser, Command, CommandLib, ProfileStorage, Profile, DietManager and CommandResult classes will be accessed. The following sequence of steps will then occur:
- User executes
viewProfileSessioncallsCommonUi.getUserCommand()to receive user input.- ProfileSession
callsProfileParser.parseCommand()` to parse user input into a string array.
- Creating
ProfileViewobject.- Based on the parsed input,
ProfileSessioncallsCommandLibto return the correct Command ObjectProfileView.
- Based on the parsed input,
- Executing command.
ProfileSessioncallsProfileView.execute()with the rest of parsed input.ProfileViewcallsProfileStorage.loadData()to load existing profile in the system. If there is no existing profile,ProfileViewreturns a failure result toProfileSession. Otherwise, the process continues with step3.ProfileViewcallsDietManager.getTodayTotalCalories()to get user’s calories intake today.- Based on user’s calories intake today and string representation of
Profile,ProfileViewreturns a result toProfileSession.
- Prompting result to user.
ProfileSessioncallsCommandResult.getCommandResult()to get theCommandResultobject.ProfileSessioncallsCommonUi.showToUser()to show result to the user.
All descriptions, warnings and responses will be handled by CommonUi to ensure consistence across the app.
The sequence diagram below summarizes how viewing an added profile works:
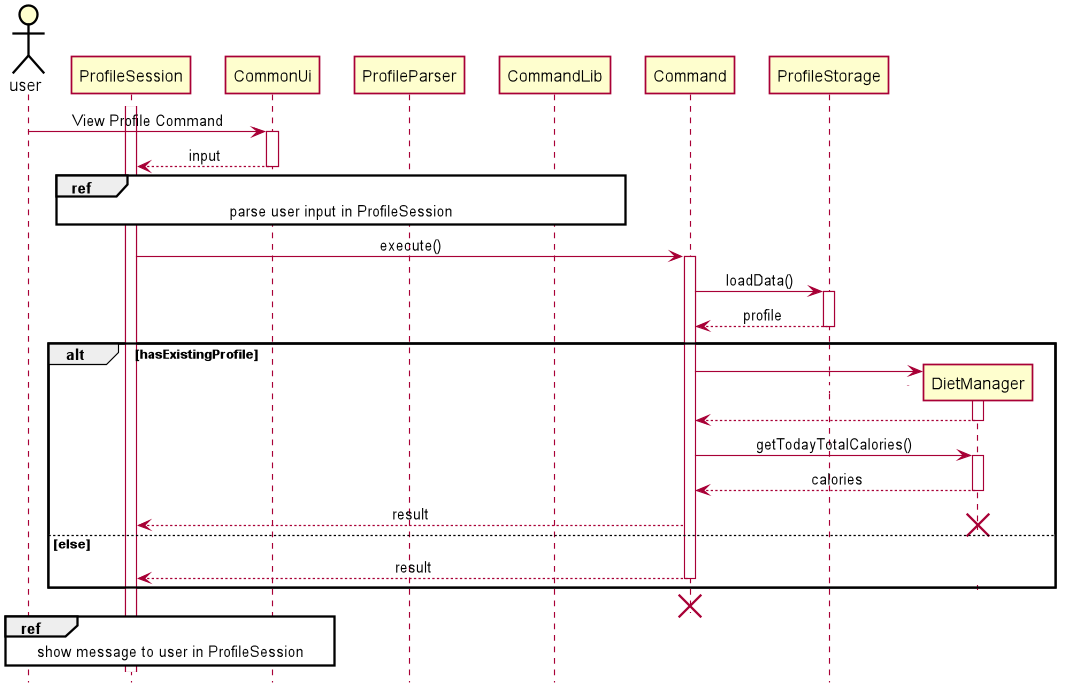
You can refer to Figure 4.2.1. Sub-diagram for Parsing Input in ProfileSession and Figure 4.2.2. Sub-diagram for Showing Message to User in ProfileSession for the corresponding sub-diagrams.
Design considerations
Aspects: Loading of stored data
-
Alternative 1 (current choice): call public methods of Storage class to load the profile from hard disk every time the user wants to view profile.
- Pros: Profile data is up-to-date if the user prefers to edit it in text file rather than using commands in The Schwarzenegger.
- Cons: Execution time is slow down due to multiple times of loading the data.
-
Alternative 2: call public methods of Storage class to load the profile from hard disk only when user enters Profile Menu.
- Pros: Execution time is fast.
- Cons: Profile data is not updated in real time if user edits it in text editor while running The Schwarzenegger.
4.2.3. Editing a Profile
This feature allows user to anytime go back to edit a profile created in the past such as editing physique data and expected daily calories intake. The failure to do so will trigger an exception where the user will be notified of the reason, e.g. invalid command format. The action will be aborted, and the program will advise the user to type “help” for command syntax reference.
If the editing is successful, a confirmation message on the edited profile will be displayed to the user.
Implementation
When the user attempts to edit a profile, the ProfileSession, CommonUi, ProfileParser, Command, CommandLib, ProfileStorage, Profile and CommandResult classes will be accessed, and the following sequence of actions is called to prompt execution result to user:
- User executes
edit /w 60ProfileSessioncallsCommonUi.getCommand()to receive user input.ProfileSessioncallsProfileParser.parseCommand()to parse user input into a string array.
- Creating
ProfileEditobject.- Based on the parsed input,
ProfileSessioncallsCommandLibto return the correct Command ObjectProfileEdit.
- Based on the parsed input,
- Executing command.
ProfileSessioncallsProfileEdit.execute()with the rest of parsed input.ProfileEditcallsProfileStorage.loadData()to load existing profile in the system. If there is no existing profile,ProfileAddreturns a failure result toProfileSession. Otherwise, the process continues with step3.ProfileEditcallsProfileParser.extractCommandTagAndInfo()to parse user input into specific tags and information.- Based on the parsed information from
ProfileParser.extractCommandTagAndInfo(),ProfileEditcreates a newProfile. ProfileEditcallsProfile.equals()to compare the newly created and existing profile. If there are no changes,ProfileEditreturns a failure result toProfileSession. Otherwise, the process continues with step6.ProfileEditcallsProfileStorage.saveData()to save the newly createdProfileobject.ProfileAddreturns a successful result toProfileSession.
- Prompting result to user.
ProfileSessioncallsCommandResult.getFeedbackMessage()to get the execution feedback message.ProfileSessioncallsCommonUi.showToUser()to show result to the user.
All descriptions, warnings and responses will be handled by CommonUi to ensure consistence across the app.
The sequence diagram below summarizes how creating a new profile works:
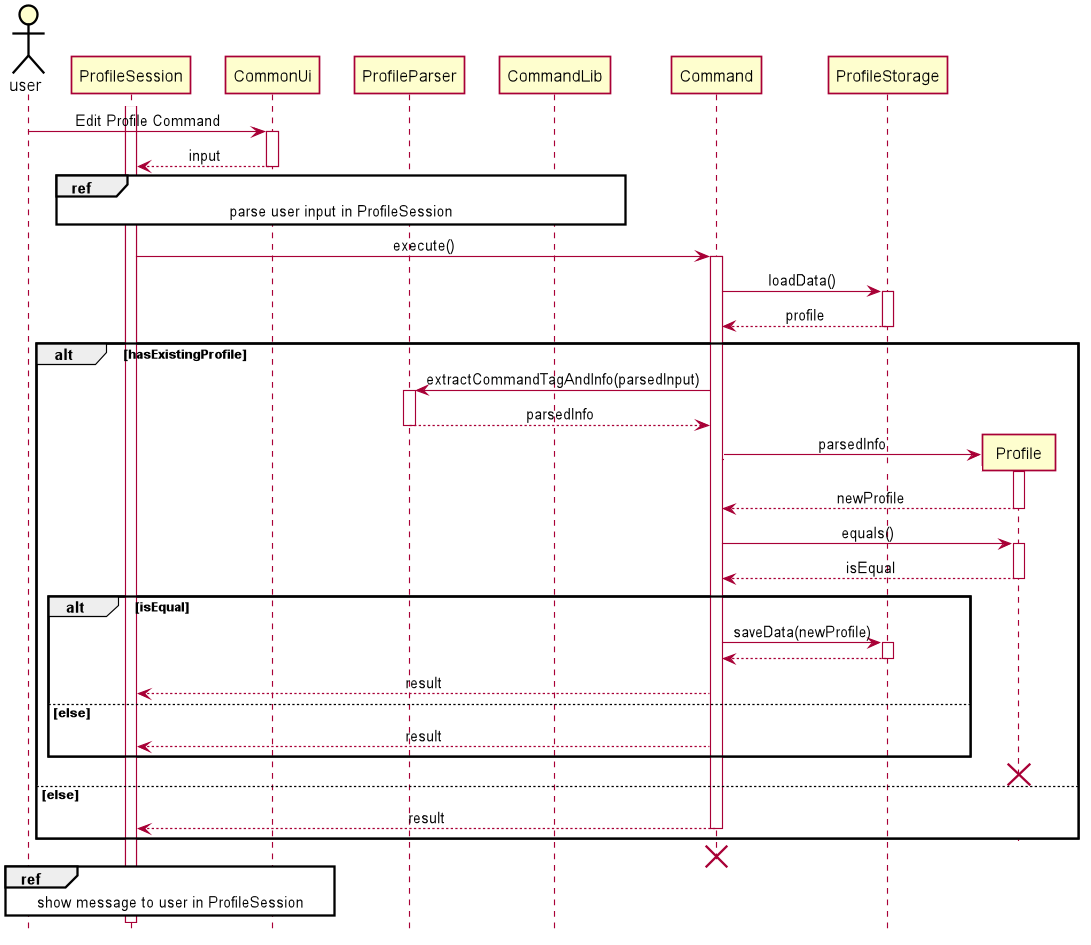
You can refer to Figure 4.2.1. Sub-diagram for Parsing Input in ProfileSession and Figure 4.2.2. Sub-diagram for Showing Message to User in ProfileSession for the corresponding sub-diagrams.
Design considerations
Parsing of the user’s input command:
-
Alternative 1 (current choice): User’s command is split into size 2 array first containing command type and command arguments. Then arguments are split into command tag and information pairs.
- Pros: Command tags do not have to follow a fixed order.
- Cons: It takes multiple steps in parsing the command.
-
Alternative 2: User’s command is divided by space.
- Pros: The parsing can be easily done by calling Java built-in function
split(). Supports multiple tags or no tags. - Cons: Values for each variable cannot contain spaces which makes the application restrictive.
- Pros: The parsing can be easily done by calling Java built-in function
4.2.4. Deleting a Profile
This feature allows user to delete a profile created in the past. The failure to do so will trigger an exception where the user will be notified of the reason, e.g. redundant parameters. The action will be aborted, and the program will advise the user to type “help” for command syntax reference.
If the deletion is successful, a confirmation message on the profile deletion will be displayed to the user.
Implementation
When the user attempts to delete an added profile, the ProfileSession, CommonUi, ProfileParser, Command, CommandLib, ProfileStorage, Profile and CommandResult classes will be accessed. The following sequence of steps will then occur:
- User executes
deleteProfileSessioncallsCommonUi.getUserCommand()to receive user input.- ProfileSession
callsProfileParser.parseCommand()` to parse user input into a string array.
- Creating
ProfileDeleteobject.- Based on the parsed input,
ProfileSessioncallsCommandLibto return the correct Command ObjectProfileDelete.
- Based on the parsed input,
- Executing command.
ProfileSessioncallsProfileDelete.execute()with the rest of parsed input.ProfileDeletecallsProfileStorage.loadData()to load existing profile in the system. If there is no existing profile,ProfileDeletereturns a failure result toProfileSession. Otherwise, the process continues with step3.ProfileDeletecallsCommonUi.CheckConfirmation()to get user’s confirmation on the deletion since this action is irrevocable. If user fails to confirm,ProfileDeletereturns an abort result toProfileSession. Otherwise, the process continues with step4.ProfileDeletecallsProfileStorage.saveData()to save anullobject which represents a deleted profile.ProfileDeletereturns a result toProfileSession.
- Prompting result to user.
ProfileSessioncallsCommandResult.getFeedbackMessage()to get the execution feedback message.ProfileSessioncallsCommonUi.showToUser()to show result to the user.
All descriptions, warnings and responses will be handled by CommonUi to ensure consistence across the app.
The sequence diagram below summarizes how deleting an added profile works:
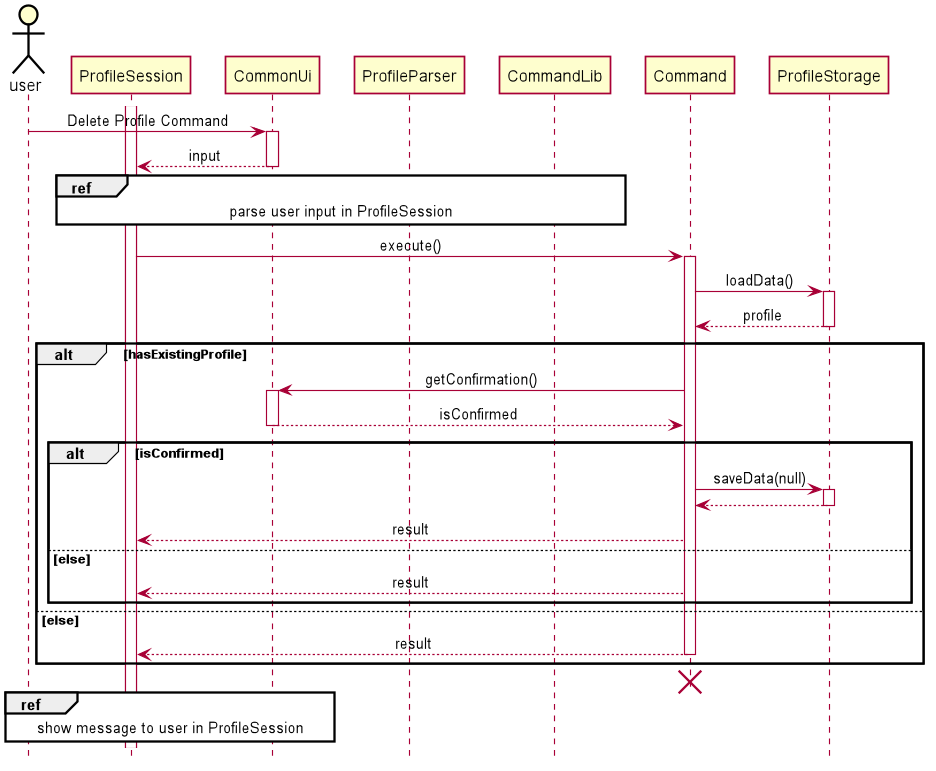
You can refer to Figure 4.2.1. Sub-diagram for Parsing Input in ProfileSession and Figure 4.2.2. Sub-diagram for Showing Message to User in ProfileSession for the corresponding sub-diagrams.
Design considerations
Aspects: Loading of stored data
-
Alternative 1 (current choice): call public methods of Storage class to load the profile from hard disk every time the user wants to delete profile.
- Pros: Profile data is up-to-date if the user prefers to edit it in text file rather than using commands in The Schwarzenegger.
- Cons: Execution time is slow down due to loading the data.
-
Alternative 2: call public methods of Storage class to load the profile from hard disk when user enter Profile Menu.
- Pros: Execution time is fast.
- Cons: Profile data is not updated in real time if user edits it in text file while running The Schwarzenegger.
4.3. Diet-related Features
4.3.1. Listing out all commands: help
This command lists out all help commands in a typed list that indicates to the user all the commands available and how to use them.
Implementation
When the user types help in a Diet Manager instance, the following sequence occurs.
- User executes
helpDietManagercallsdietManagerUi.getCommand()to receive user input.DietManagercallsDietManagerParser.parseCommand()to parse user input into a string array.
- Creating
DietSessionHelpobject.- Based on the parsed input,
DietManagercallsCommandLibto return the correct Command ObjectDietSessionHelp.
- Based on the parsed input,
- Executing command.
DietManagercallsDietSessionHelp.execute()with the rest of parsed input.DietSessionHelpappends onto a string builder a list of typed help commands.DietSessionHelpreturns aCommandResultobject with the help message.
- Prompting result to user.
DietManagercallsCommandResult.getFeedbackMessage()to get the execution feedback message.CommandResultcallsUi.showToUser()to show result to the user.
4.3.2. Start recording diet data: new
The feature allows users to start recording diet data.
Implementation
When the user types new </d [DATE]> </t [TAG]> the following sequence occurs.
- User executes
new /d 2020-05-04 /t breakfastDietManagercallsdietManagerUi.getCommand()to receive user input.DietManagercallsDietManagerParser.parseCommand()to parse user input into a string array.
- Creating
DietSessionHelpobject.- Based on the parsed input,
DietManagercallsCommandLibto return the correct Command ObjectDietSessionCreate.
- Based on the parsed input,
- Executing command.
DietManagercallsDietSessionCreate.execute()with the rest of parsed input.DietSessionCreatecalls thestart()method within an instantiated DietSession created with the parsed input.DietSessionthen proceeds to completion until the user types “end”, saving after every command withDietStorage.DietSessionHelpreturns aCommandResultobject with the help message of the diet manager.
- Prompting result to user.
DietManagercallsCommandResult.getFeedbackMessage()to get the execution feedback message.CommandResultcallsUi.showToUser()to show result to the user.
The sequence diagram below summarizes how creating new diet session works:
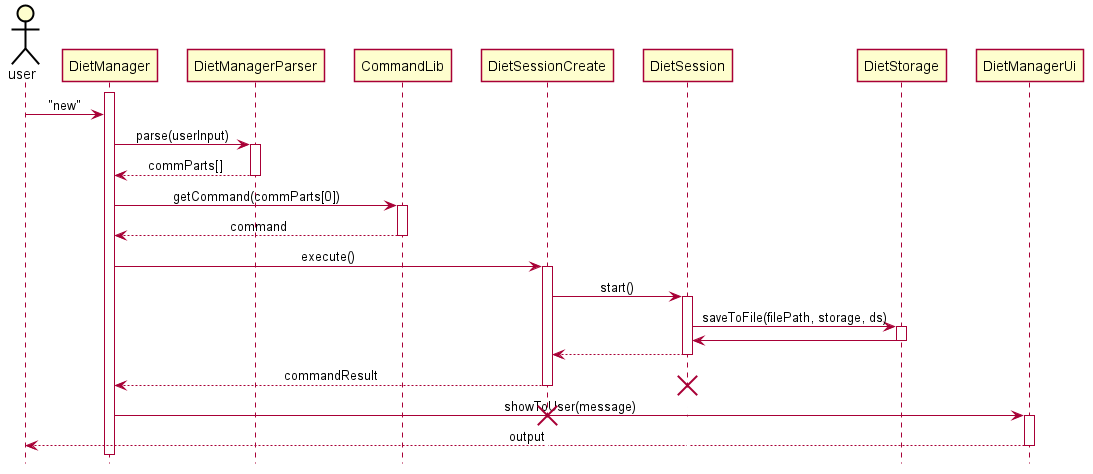
Figure 4.3.2.1. CreateDietSession-diagram for Parsing Input in DietManager
4.3.2.1. Showing help message: help
This command lists out all help commands in a typed list that indicates to the user all the commands available and how to use them.
Implementation
When the user types help the following sequence occurs.
- The user keys in
help.DietSessioncallsdietSessionUi.getCommand()to receive user input.DietSessioncallsDietSessionParser.parseCommand()to parse user input into a string array.
- Creating
FoodItemHelpobject.- Based on the parsed input,
DietSessioncallsCommandLibto return the correct Command ObjectFoodItemHelp.
- Based on the parsed input,
- Executing command.
DietSessioncallsFoodItemHelp.execute().FoodItemHelpappends onto a string builder a list of typed help commands.FoodItemHelpreturns aCommandResultobject with the help message.
- Prompting result to user.
DietSessioncallsCommandResult.getFeedbackMessage()to get the execution feedback message.CommandResultcallsUi.showToUser()to show result to the user.
4.3.2.2. Adding food items for the current diet: add
The feature allows users to add food items into the current diet session.
Implementation
When the user types add [FOOD_NAME] /c [CALORIES] the following sequence occurs.
- The user keys in
add bologna /c 123.DietSessioncallsdietSessionUi.getCommand()to receive user input.DietSessioncallsDietSessionParser.parseCommand()to parse user input into a string array.
- Creating
FoodItemAddobject.- Based on the parsed input,
DietSessioncallsCommandLibto return the correct Command ObjectFoodItemAdd.
- Based on the parsed input,
- Executing command.
DietSessioncallsFoodItemAdd.execute().- A
Foodobject is instantiated with the rest of the parameters,bolognaand123. - The instantiated
Foodobject is added to an ArrayList of Food objects inDietSession FoodItemHelpreturns aCommandResultobject with the add food item message.
- Prompting result to user.
DietSessioncallsCommandResult.getFeedbackMessage()to get the execution feedback message.CommandResultcallsUi.showToUser()to show result to the user.
The sequence diagram below summarizes how adding a new food to the diet session works:
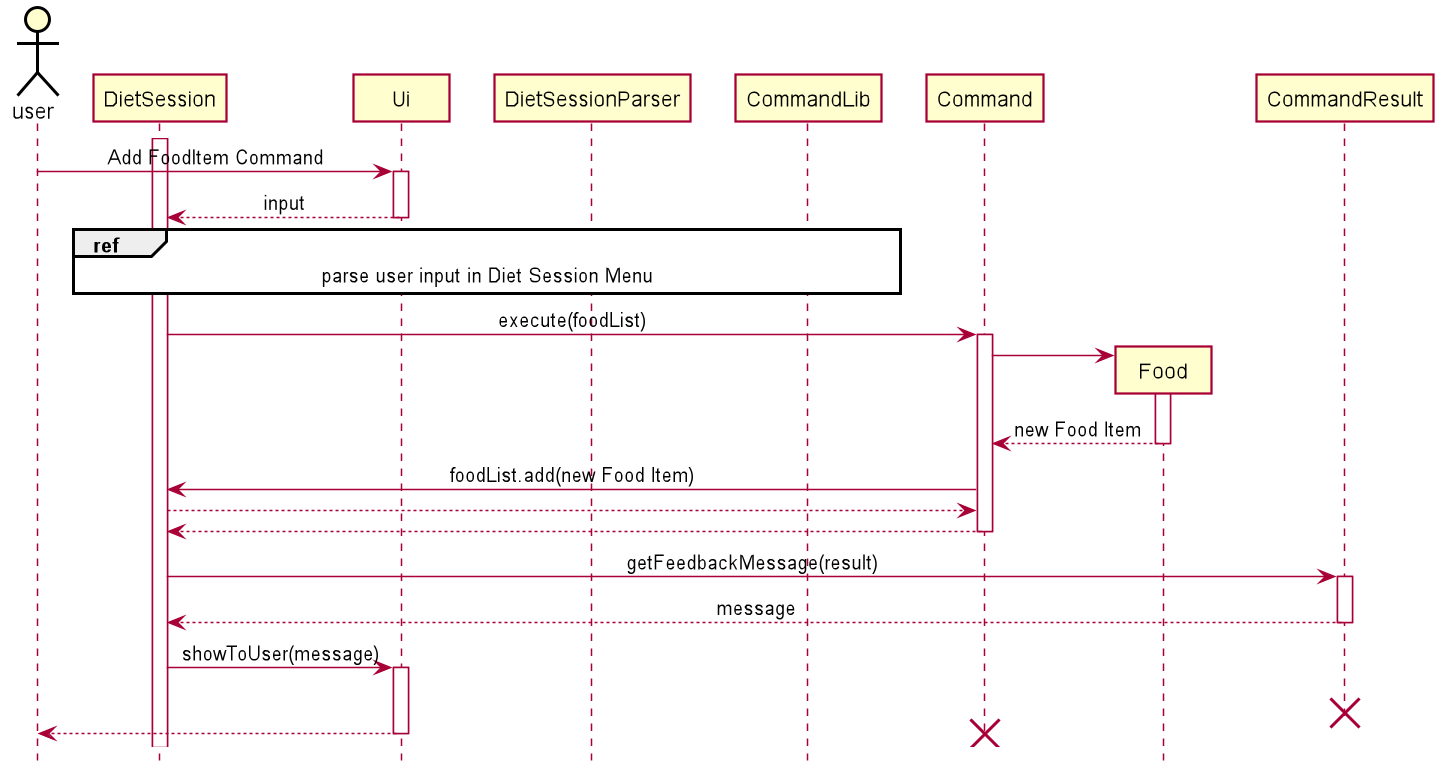

Figure 4.3.2.2.1. Sub-diagram for Parsing Input in DietSession
4.3.2.3. Listing data for the current diet: list
This command allows users to view all food items in the current diet session.
Implementation
When the user types list the following sequence occurs.
- The user keys in
list.DietSessioncallsdietSessionUi.getCommand()to receive user input.DietSessioncallsDietSessionParser.parseCommand()to parse user input into a string array.
- Creating
FoodItemListobject.- Based on the parsed input,
DietSessioncallsCommandLibto return the correct Command ObjectFoodItemList.
- Based on the parsed input,
- Executing command.
DietSessioncallsFoodItemList.execute().- The ArrayList of Food objects is iterated through and stored in a String.
FoodItemListreturns aCommandResultobject with the list of food items.
- Prompting result to user.
DietSessioncallsCommandResult.getFeedbackMessage()to get the execution feedback message.CommandResultcallsUi.showToUser()to show result to the user.
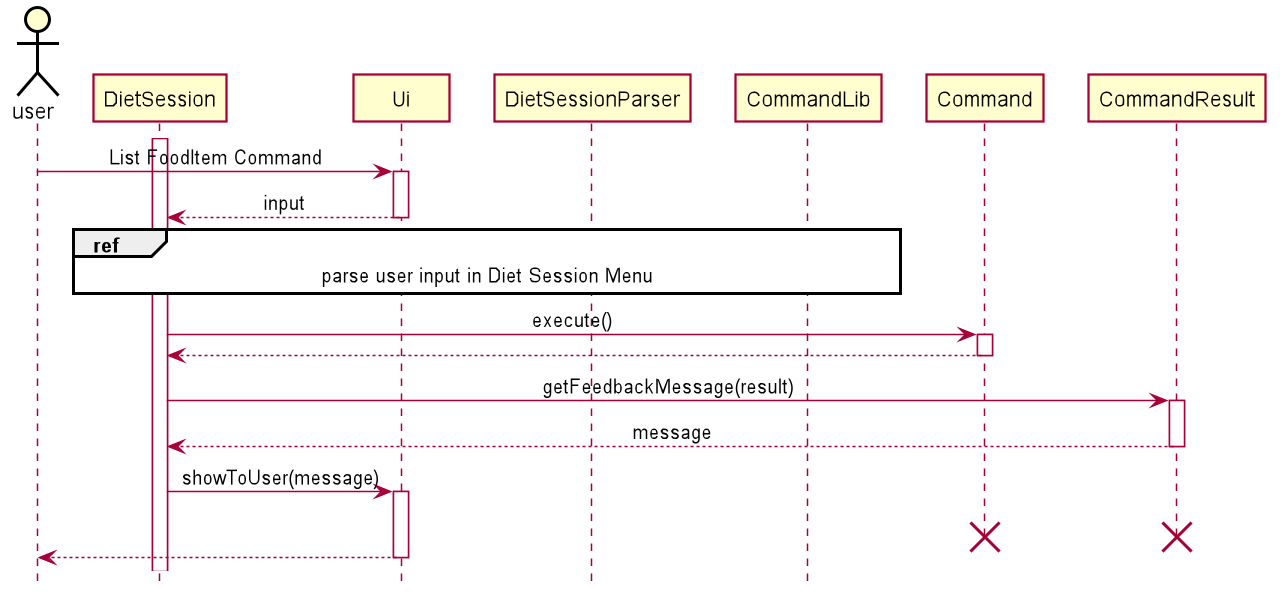
Design considerations
Aspects: Displaying of listed data
-
Alternative 1 (current choice): Print out a neatly formatted list of food items.
- Pros: The information is easy to read due to neat formatting.
- Cons: Execution time is slower as it requires more calculations.
-
Alternative 2: Print out toString() for each Food item.
- Pros: Execution time is fast.
- Cons: The information is harder to filter through.
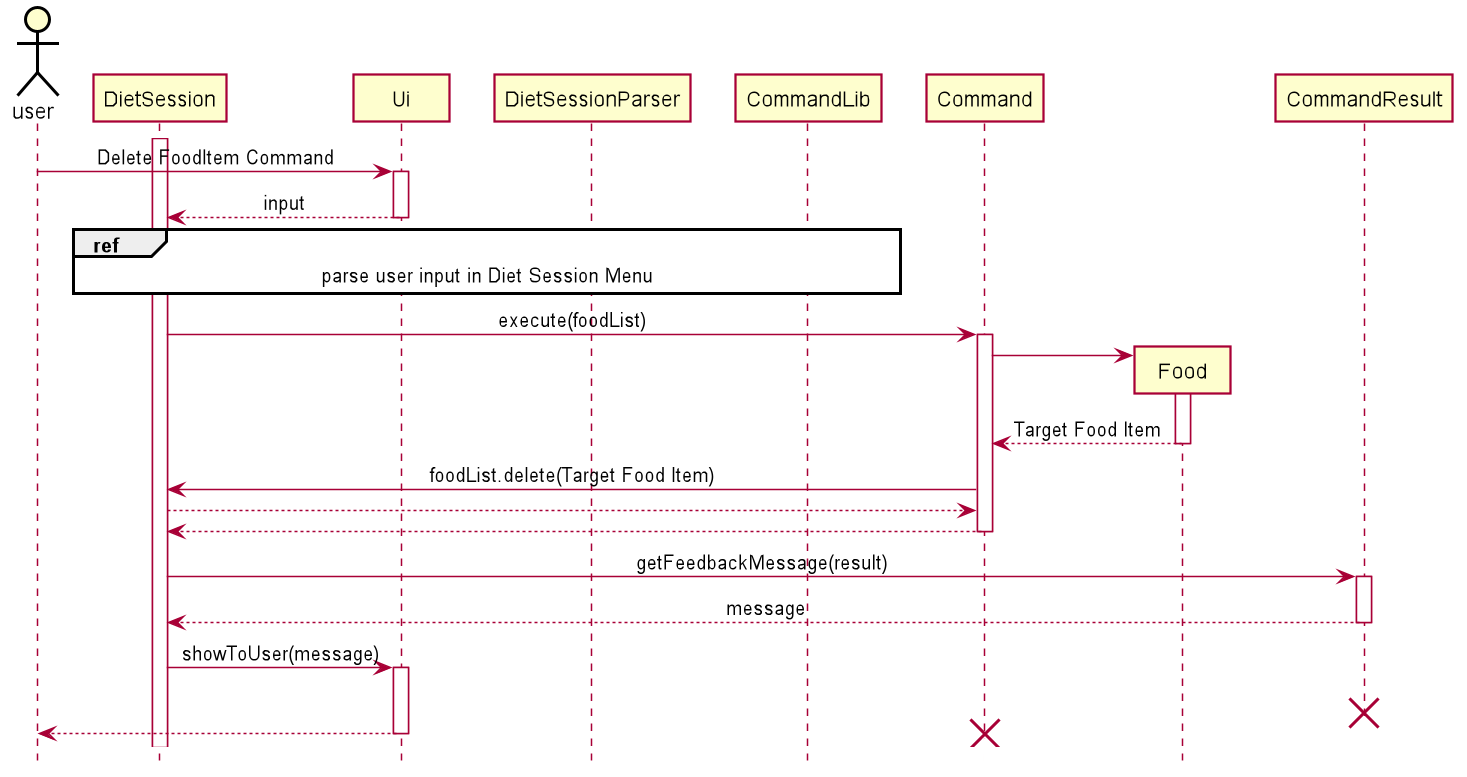
4.3.2.4. Deleting data from the current diet session: delete
The feature allows users to remove food items into the current diet session.
Implementation
When the user types delete [INDEX_OF_FOOD] the following sequence occurs.
- The user keys in
delete 1.DietSessioncallsdietSessionUi.getCommand()to receive user input.DietSessioncallsDietSessionParser.parseCommand()to parse user input into a string array.
- Creating
FoodItemDeleteobject.- Based on the parsed input,
DietSessioncallsCommandLibto return the correct Command ObjectFoodItemDelete.
- Based on the parsed input,
- Executing command.
DietSessioncallsFoodItemDelete.execute().- The index-1 of the ArrayList for the food is removed.
FoodItemDeletereturns aCommandResultobject with the delete success message.
- Prompting result to user.
DietSessioncallsCommandResult.getFeedbackMessage()to get the execution feedback message.CommandResultcallsUi.showToUser()to show result to the user.
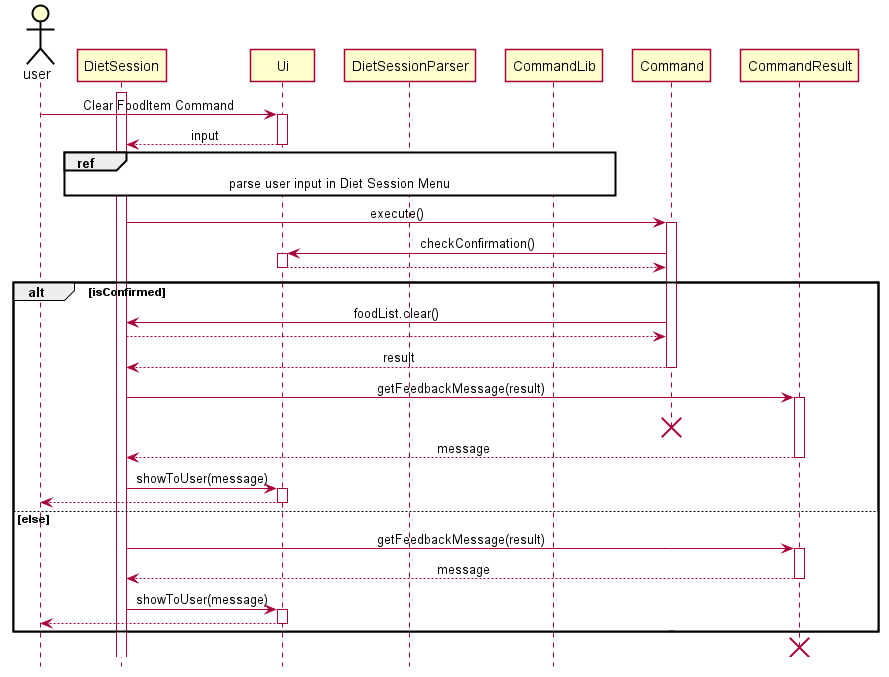
4.3.2.5. Clearing all data from the current diet session clear
The feature allows users to remove food items into the current diet session.
Implementation
When the user types clear the following sequence occurs.
- The user keys in
clear.DietSessioncallsdietSessionUi.getCommand()to receive user input.DietSessioncallsDietSessionParser.parseCommand()to parse user input into a string array.
- Creating
FoodItemClearobject.- Based on the parsed input,
DietSessioncallsCommandLibto return the correct Command ObjectFoodItemClear.
- Based on the parsed input,
- Executing command.
DietSessioncallsFoodItemClear.execute().- A new ArrayList of Food is assigned to the original, leaving it with no data inside.
FoodItemClearreturns aCommandResultobject with the clear success message.
- Prompting result to user.
DietSessioncallsCommandResult.getFeedbackMessage()to get the execution feedback message.CommandResultcallsUi.showToUser()to show result to the user.
Design considerations
Aspects: Ram usage
-
Alternative 1 (current choice): Assigning a new ArrayList to the current variable.
- Pros: Fast.
- Cons: Garbage collection has to pick up the unassigned ArrayList.
-
Alternative 2: delete every item in the ArrayList one by one.
- Pros: Less memory needed as there is nothing new to allocate.
- Cons: A lot slower as it has to iterate through every item.
4.3.2.6. Stopping the recording of diet session data: end
The feature allows users to end the current diet session and return back to the diet manager.
Implementation
When the user types end the following sequence occurs.
-
The user keys in
end.- A
DietSessionUicomponent will calldietSessionUI.getInput(). - Input will be parsed in
processCommand().
- A
-
Exiting of inputLoop() The inputLoop() exits when userInput.equals(“end”).
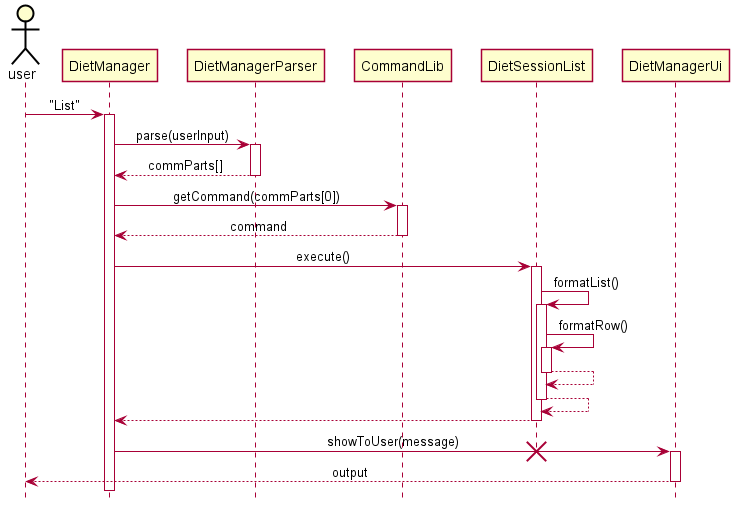
4.3.3. List all past diet sessions: list
The feature allows users to view all past created diet sessions.
Implementation
When the user types list in a diet manager instance the following sequence occurs.
- The user keys in
list.DietManagercallsdietManagerUi.getCommand()to receive user input.DietManagercallsDietManagerParser.parseCommand()to parse user input into a string array.
- Creating
DietSessionListobject.- Based on the parsed input,
DietManagercallsCommandLibto return the correct Command ObjectDietSessionList.
- Based on the parsed input,
- Executing command.
DietManagercallsDietSessionList.execute()with the rest of parsed input.- The execute method opens a directed save folder on the drive then assigns it to a File array.
DietSessionListthen calls theformatList()method which takes the File Array and converts it into an ArrayList.DietSessionListthen calls theformatRow()method from within formatList() which converts the files into a formatted table output.DietSessionListreturns a CommandResult object with the entire table message of the diet sessions.
- Prompting result to user.
DietManagercallsCommandResult.getFeedbackMessage()to get the execution feedback message.CommandResultcallsUi.showToUser()to show result to the user.
The sequence diagram below summarizes how listing past Diet sessions work:
-
Alternative 1 (current choice): Print out a neatly formatted list of diet sessions.
- Pros: The information is easy to read due to neat formatting.
- Cons: Execution time is slower as it requires a lot more calculations.
-
Alternative 2: Print out the file name.
- Pros: Execution time is fast.
- Cons: The information is harder to filter through.
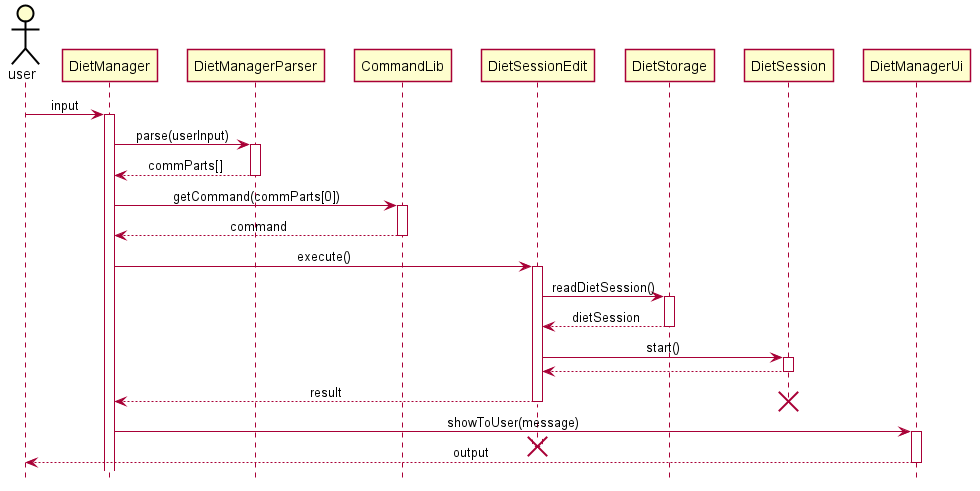
4.3.4. Edit a past diet session: edit
The feature allows users to edit previously created diet sessions.
Implementation
When the user types edit [INDEX_OF_SESSION] the following sequence occurs.
- The user keys in
edit 1.DietManagercallsdietManagerUi.getCommand()to receive user input.DietManagercallsDietManagerParser.parseCommand()to parse user input into a string array.
- Creating
DietSessionEditobject.- Based on the parsed input,
DietManagercallsCommandLibto return the correct Command ObjectDietSessionEdit.
- Based on the parsed input,
- Executing command.
DietManagercallsDietSessionEdit.execute()with the rest of parsed input.- The execute method then calls
readDietSession()from DietStorage which returns a dietSession instance. DietSessionEditthen calls thestart()method within an instantiated DietSession created with the parsed input.DietSessionthen proceeds to completion until the user types “end”, saving after every command withDietStorage.DietSessionHelpreturns a CommandResult object with the help message of the diet manager.
- Prompting result to user.
DietManagercallsCommandResult.getFeedbackMessage()to get the execution feedback message.CommandResultcallsUi.showToUser()to show result to the user.
The sequence diagram below summarizes how editing Diet session works:
Design considerations Saving of the user’s Diet sessions:
-
Alternative 1: Saving at the end of a diet session
- Pros: The cost of saving is low, file writes only happen once per Diet session instance.
- Cons: If any crashes occur during a diet session, no input data will be saved.
-
Alternative 2 (current choice): Saving during any alterations made to the Diet session
- Pros: The files will still be saved even if a crash occurs.
- Cons: Saving often might be taxing on the user’s computer especially on slower models.
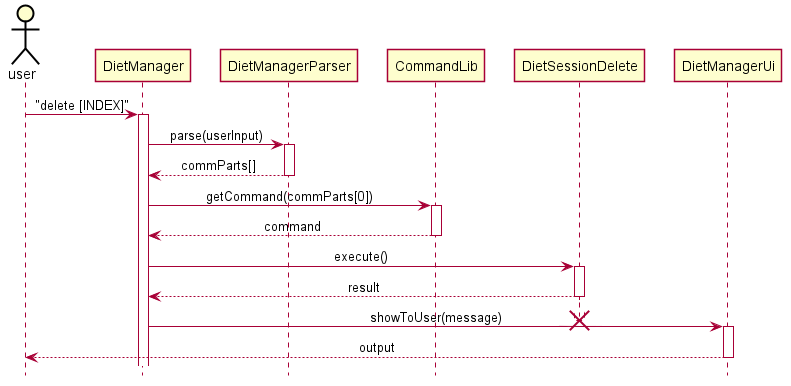
4.3.5. Delete a previously created diet session: delete
The feature allows users to delete previously created diet sessions.
Implementation
When the user types delete [INDEX_OF_SESSION] from a Diet manager instance the following sequence occurs.
- The user keys in
delete 1.DietManagercallsdietManagerUi.getCommand()to receive user input.DietManagercallsDietManagerParser.parseCommand()to parse user input into a string array.
- Creating
DietSessionDeleteobject.- Based on the parsed input,
DietManagercallsCommandLibto return the correct Command ObjectDietSessionDelete.
- Based on the parsed input,
- Executing command.
DietManagercallsDietSessionDelete.execute()with the rest of parsed input.- The execute method then deletes the file at the indicated index
1if a file was present there. DietSessionDeletereturns a CommandResult object with the delete confirmation message from DietmanagerUi.
- Prompting result to user.
DietManagercallsCommandResult.getFeedbackMessage()to get the execution feedback message.CommandResultcallsUi.showToUser()to show result to the user.
The sequence diagram below summarizes how Diet sessions are deleted:
-
Alternative 1 (current choice): Provides an indexed array for the user to choose from to delete.
- Pros: The user can delete things easier as it only requires typing a number.
- Cons: Execution time is slower as it requires more calculations.
-
Alternative 2: Delete based on a user string input of the file name.
- Pros: Easier to implement.
- Cons: Users are greatly inconvenienced by how much they have to type.
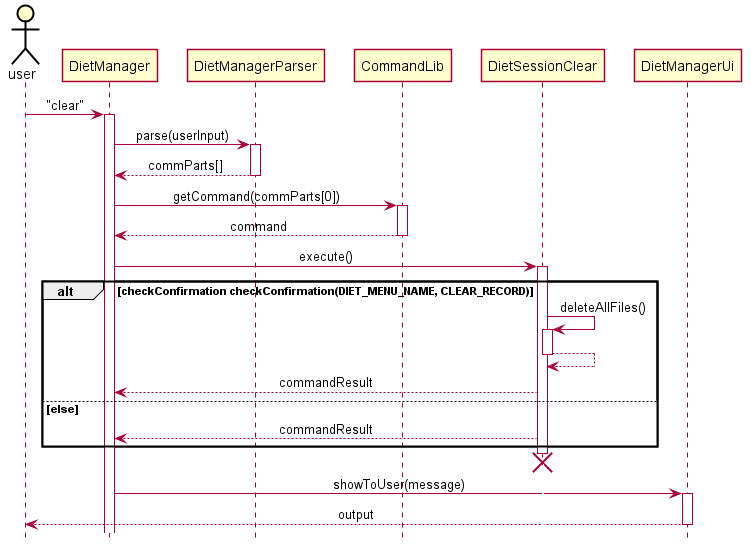
4.3.6. Clear all past diet session: clear
The feature allows users to clear all previously created diet sessions at once.
Implementation
When the user types clear the following sequence occurs.
- The user keys in
clear.DietManagercallsdietManagerUi.getCommand()to receive user input.DietManagercallsDietManagerParser.parseCommand()to parse user input into a string array.
- Creating
DietSessionClearobject.- Based on the parsed input,
DietManagercallsCommandLibto return the correct Command ObjectDietSessionClear.
- Based on the parsed input,
- Executing command.
DietManagercallsDietSessionDelete.execute()with the rest of parsed input.- The execute method then deletes the file at the indicated index
1if a file was present there. DietSessionDeletereturns a CommandResult object with the delete confirmation message from DietmanagerUi.
- Prompting result to user.
DietManagercallsCommandResult.getFeedbackMessage()to get the execution feedback message.CommandResultcallsUi.showToUser()to show result to the user.
The sequence diagram below summarizes how Diet sessions are all cleared:
-
Alternative 1 (current choice): Iterate through an array of files and delete everything.
- Pros: The file structure is more homogeneous.
- Cons: Execution time is slower as it requires iterating through every file in the array.
-
Alternative 2: delete the folder with the save files in it.
- Pros: Execution time is faster though still limited by storage speed.
- Cons: File structure of the entire program is not as stable.
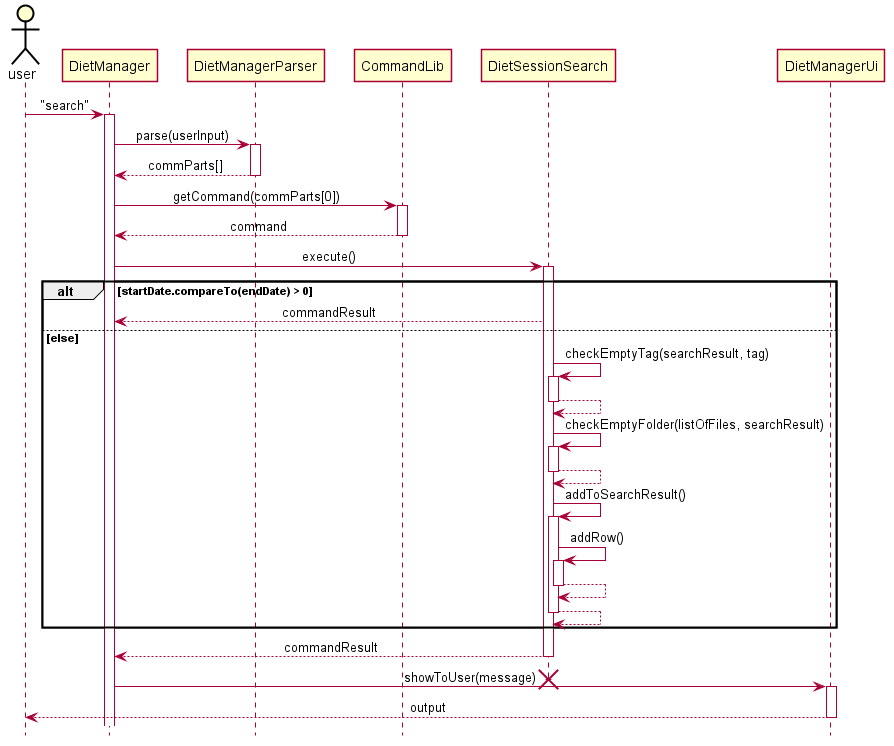
4.3.7. Search for Past Diet Sessions: search
The feature allows users to search for previously created diet sessions within a date range or with a specified tag.
Implementation
When the user types search /s 2020-11-01 /e 2020-11-03 /t breakfast the following sequence occurs.
- The user keys in
search /s 2020-11-01 /e 2020-11-03 /t breakfast.DietManagercallsdietManagerUi.getCommand()to receive user input.DietManagercallsDietManagerParser.parseCommand()to parse user input into a string array.
- Creating
DietSessionSearchobject.- Based on the parsed input,
DietManagercallsCommandLibto return the correct Command ObjectDietSessionSearch.
- Based on the parsed input,
- Executing command.
DietManagercallsDietSessionSearch.execute()with the rest of parsed input.- The execute method then iterates through the entire folder and looks for empty tags and folders with the methods
checkEmptyTag()andcheckEmptyFolder. DietSessionSearchcalls theaddToSearchResult()method which from within calls theaddRow()method that converts the file output into a table format.DietSessionSearchreturns aCommandResultobject with the search results.- If the starting search date is after the ending search date, the method will return with an exception which is then returned with the
CommandResultmessage.
- Prompting result to user.
DietManagercallsCommandResult.getFeedbackMessage()to get the execution feedback message.CommandResultcallsUi.showToUser()to show result to the user.
The sequence diagram below summarizes how Diet sessions is searched:
-
Alternative 1 (current choice): Search by date and tags.
- Pros: Users can get a precise range of dates for their diet sessions.
- Cons: Execution time is slower as it requires more calculations.
-
Alternative 2: Search only by tags.
- Pros: Easier to implement.
- Cons: The information is harder to filter through.
4.3.8. Exit the Diet manager: end
The function returns the user back to the main menu of The Schwarzenegger.
Implementation
When the user types end the following sequence occurs.
-
The user keys in
end.- A
DietSessionUicomponent will calldietSessionUI.getInput(). - Input will be parsed in
processCommand().
- A
-
Exiting of inputLoop() The inputLoop() exits when userInput.equals(“end”), returning to the
Start()method, then ending theDietManagerinstance.
4.4. Workout-related Features
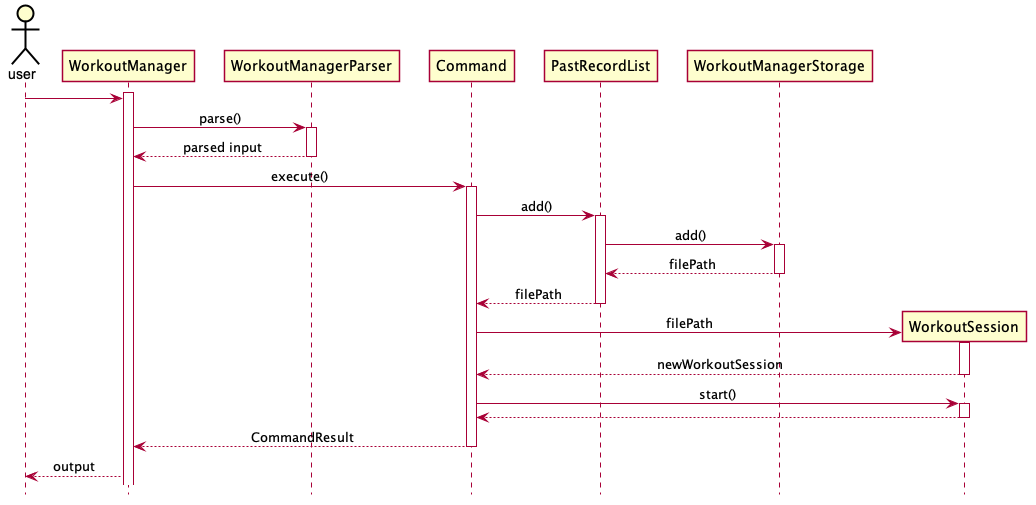
4.4.1. Creating a New Workout Session
Users can create a new workout session. The failure to do so will trigger an exception where the user will be notified of the reason, e.g. invalid command or IO related errors. The action will be aborted. If the creation is successful, the user will go into the new workout session to edit the exercises in that session.
The user can specify tags for the session. Creation time, last edit time and saving file name will be auto generated by the application and saved.
Implementation
When the user attempts to create a new workout session, the Ui, WorkoutManagerParser and CommandLib class will be accessed and the following sequence of actions are called to return a command object NewWs.
- User executes
new /t leg chestWorkoutManagercallsUi.getUserCommand()to receive user input.WorkoutManagercallsWorkoutManagerParser.parseinto a string array
- Creation of command object.
- Based on the parsed input,
WorkoutManagercallsCommandLibto return the correct Command ObjectNewWs.
- Based on the parsed input,
- Executing Command
WorkoutManagercallsNewWS.execute()with the rest of parsed input.NewWSparse the arguments to identify the tagsNewWScallsPastRecordList.add()to create a new file to store information in this session. If the creation fails, the action is aborted. Else, this record will be stored and the file path will be returned.NewWScreates a newWorkoutSessionObject with the file path.NewWScallsworkoutSession. workoutSessionStart()so that user can add information into this session.- After user exits this workout,
WorkoutManagerreturns aCommandResult.
- Based on
CommandResult, correct response will be printed to user.
All description, warnings and response will be handled by Ui to ensure consistence across the app.
The following sequence diagram shows how the new command works
The sequence diagram below summarizes how creating new workout session works:
 Design considerations
Parsing of the user’s input command:
-
Alternative 1 (current choice): User’s commands are divided by space.
- Pros: The parsing can be easily done by calling Java built-in function .split(). Supports multiple tags or no tags.
- Cons: Values for each variable cannot contain spaces which makes the application restrictive.
-
Alternative 2: Multiple prompts for user’s input of a workout data.
- Pros: Users would not have to make sure that their command is syntactically right.
- Cons: The constant prompting could subject the application to a negative experience in the difficulty to use the commands.
4.4.1.1. Adding an Exercise
Users can add a new exercise. The failure to do so will trigger an exception where the user will be notified of the reason, e.g. invalid command or IO related errors. The action will be aborted. If the addition is successful, a new exercise will be added to the exerciselist.
Implementation
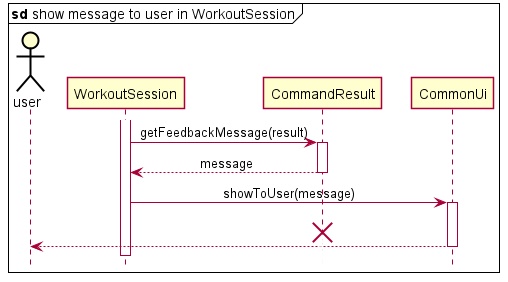
When the user attempts to add a new exercise, the CommonUi, WorkoutSession, WorkoutSessionParser , CommandLib, WorkoutSessionAdd and WorkoutSessionStorage class will be accessed and the following sequence of actions are called to return a CommandResult object containing a message to show to user.
- User executes
add benchpress /n 6 /w 120WorkoutSessioncallsCommonUi.getUserCommand()to receive user input.WorkoutSessioncallsWorkoutSessionParser.workoutSessionParserto convert the input to a string array.
- Creation of command object.
- Based on the parsed input,
WorkoutSessioncallsCommandLibto return the correct Command ObjectWorkoutSessionAdd.
- Based on the parsed input,
- Executing Command
WorkoutSessioncallsWorkoutSessionAdd.execute()with the rest of parsed input.WorkoutSessionAddparse the arguments to identify the repetitions and weight for the exercise.WorkoutSessionAddcallsWorkOutSession.Storage.writeToFile()to store information of all exercises recorded.WorkoutSessionAddreturns aCommandResultto WorkoutSession`.
- Based on
CommandResult, correct response will be printed to user.
All description, warnings and response will be handled by CommonUi to ensure consistence across the app.
The sequence diagram below summarizes how the add command works:
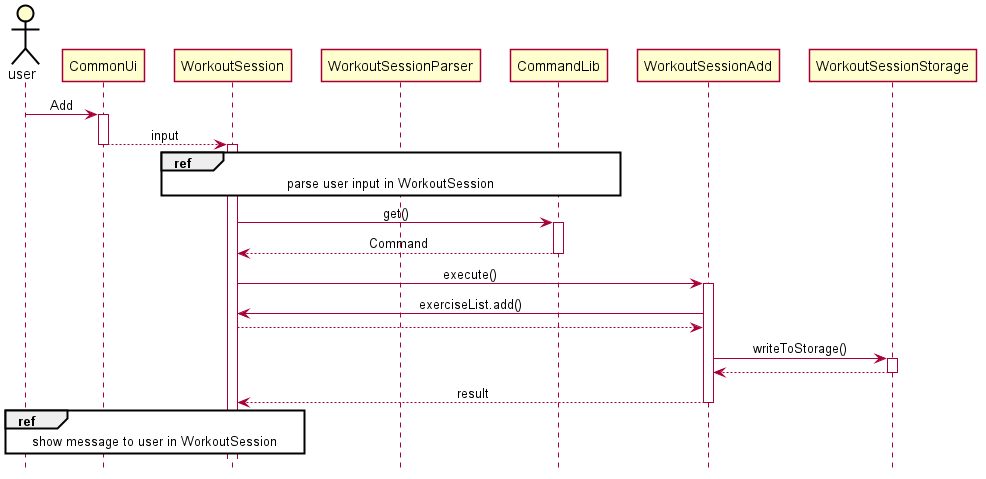
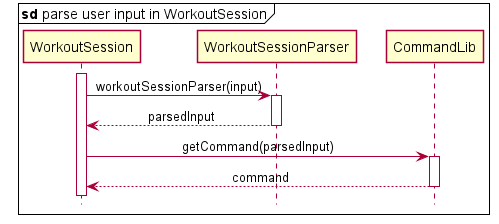
Figure 4.4.1.1.1. Sub-diagram for Parsing Input in WorkoutSession
Figure 4.4.1.1.2. Sub-diagram for Showing Message to User
Design considerations Aspects: Making add and its parameters as seperate or a single input
-
Alternative 1 (current choice): Making add and its parameters as a single input
- Pros: Would be easier for the user to enter as it takes less time to enter and it is not too difficult of a command.
- Cons: It might cause the user to miss the format for inputting add.
-
Alternative 2: Making add and its parameters as separate inputs
- Pros: Would make it neater and more clear to the user what to enter as they would only enter one input every time.
- Cons: It would take multiple actions to perform a single task, depending on the number of parameters.
4.4.1.2. Deleting an Exercise
Users can delete an exercise from a pre-existing list of exercise. The failure to do so will trigger an exception where the user will be notified of the reason, e.g. invalid command or IO related errors. The action will be aborted. If the deletion is successful, a new exercise will be added to the exerciselist.
Implementation
When the user attempts to delete an exercise, the CommonUi, WorkoutSession, WorkoutSessionParser , CommandLib, WorkoutSessionDelete and WorkoutSessionStorage class will be accessed and the following sequence of actions are called to return a CommandResult object containing a message to show to user.
- User executes
delete 1WorkoutSessioncallsCommonUi.getUserCommand()to receive user input.WorkoutSessioncallsWorkoutSessionParser.workoutSessionParserto convert the input to a string array.
- Creation of command object.
- Based on the parsed input,
WorkoutSessioncallsCommandLibto return the correct Command ObjectWorkoutSessionDelete.
- Based on the parsed input,
- Executing Command
WorkoutSessioncallsWorkoutSessionDelete.execute()with the rest of parsed input.WorkoutSessionDeleteparse the arguments to identify the index of the exercise to be deleted.WorkoutSessionDeletecallsexerciseList.remove()to delete the respective exercise.WorkoutSessionDeletecallsWorkOutSession.Storage.writeToFile()to store information of all exercises recorded.WorkoutSessionDeletereturns aCommandResultto WorkoutSession`.
- Based on
CommandResult, correct response will be printed to user.
All description, warnings and response will be handled by CommonUi to ensure consistence across the app.
The sequence diagram below summarizes how the delete command works:
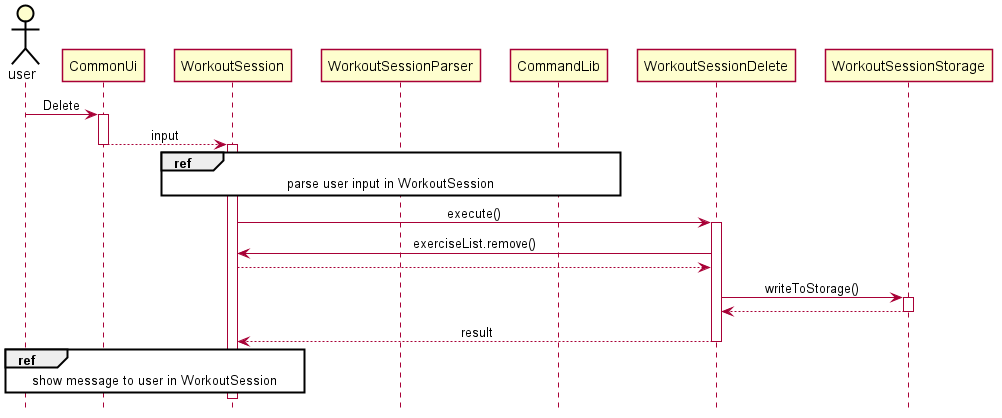
You can refer to Figure 4.4.1.1.1. Sub-diagram for Parsing Input in WorkoutSession and Figure 4.4.1.1.2. Sub-diagram for Showing Message to User for the corresponding sub-diagrams.
Design considerations Aspects: Making delete and index to delete as separate or a single input
-
Alternative 1 (current choice): Making delete and index to delete as a single input
- Pros: Would be easier for the user to enter as it takes less time to enter and it is not too difficult of a command.
- Cons: It might cause the user to miss the format for inputting delete.
-
Alternative 2: Making delete and index to delete as separate inputs
- Pros: Would make it neater and more clear to the user what to enter as they would only enter one input every time.
- Cons: It would take two actions to perform a single task.
4.4.1.3. Listing All Exercises in This Session
Users can list all exercise from a pre-existing list of exercise. The failure to do so will trigger an exception where the user will be notified of the reason, e.g. invalid command or IO related errors. The action will be aborted. If the listing is successful, the user will be able to see the full list of exercises.
Implementation
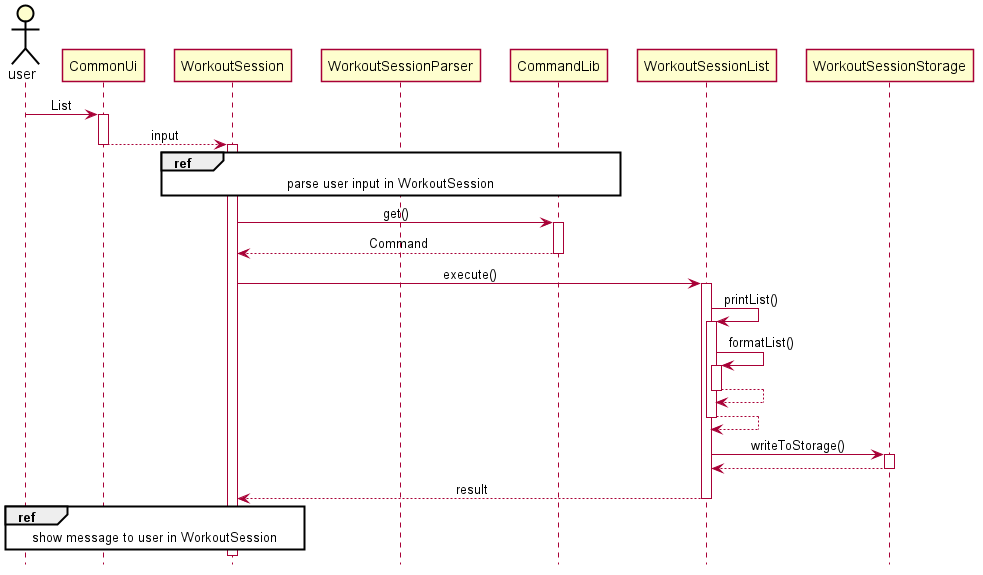
When the user attempts to list all exercises, the CommonUi, WorkoutSession, WorkoutSessionParser , CommandLib, WorkoutSessionList and WorkoutSessionStorage class will be accessed and the following sequence of actions are called to return a CommandResult object containing a message to show to user.
- User executes
listWorkoutSessioncallsCommonUi.getUserCommand()to receive user input.WorkoutSessioncallsWorkoutSessionParser.workoutSessionParserto convert the input to a string array.
- Creation of command object.
- Based on the parsed input,
WorkoutSessioncallsCommandLibto return the correct Command ObjectWorkoutSessionList.
- Based on the parsed input,
- Executing Command
WorkoutSessioncallsWorkoutSessionList.execute()with the rest of parsed input.WorkoutSessionListcallsWorkoutSessionList.printList()to check if the list is empty.WorkoutSessionList.printList()callsWorkoutSessionList.formatList()to arrange the list in a readable and dynamic format for the user.WorkoutSessionList.formatList()returns a String of formatted output toWorkoutSessionList.printList()then toWorkoutSessionList.WorkoutSessionListreturns aCommandResulttoWorkoutSession.
- Based on
CommandResult, correct response will be printed to user.
All description, warnings and response will be handled by CommonUi to ensure consistence across the app.
The sequence diagram below summarizes how the list command works:
Design considerations Aspects: Length of results
-
Alternative 1 (current choice): Make the length for displaying exercise dynamic
- Pros: The table would look more appealing as the spacing would be dynamic.
- Cons: It is a lot more difficult to code.
-
Alternative 2: Make the length allocated for exercise really long
- Pros: The code would be simpler.
- Cons: The table would look ugly for the user to look at.
4.4.1.4. Searching for Related Exercises
Users can search for an exercise from a pre-existing list of exercise. The failure to do so will trigger an exception where the user will be notified of the reason, e.g. invalid command or IO related errors. The action will be aborted. If the searching is successful, the user will be able to see the list of exercises that match.
Implementation
When the user attempts to search for an exercise from all exercises, the CommonUi, WorkoutSession, WorkoutSessionParser , CommandLib, WorkoutSessionSearch and WorkoutSessionStorage class will be accessed and the following sequence of actions are called to return a CommandResult object containing a message to show to user.
- User executes
search benchWorkoutSessioncallsCommonUi.getUserCommand()to receive user input.WorkoutSessioncallsWorkoutSessionParser.workoutSessionParserto convert the input to a string array.
- Creation of command object.
- Based on the parsed input,
WorkoutSessioncallsCommandLibto return the correct Command ObjectWorkoutSessionSearch.
- Based on the parsed input,
- Executing Command
WorkoutSessioncallsWorkoutSessionSearch.execute()with the rest of parsed input.WorkoutSessionSearchchecks if the search term is empty. If it is empty,WorkoutSessionSearchreturns a failure result toWorkoutSession. Otherwise, the process continues with step3WorkoutSessionSearchcallsWorkoutSessionSearch.formatList()to search the search term with the exerciseList. If it is empty,WorkoutSessionSearch.formatList()returns a failure result toWorkoutSession. Otherwise, the process continues with step4WorkoutSessionSearchreturns aCommandResulttoWorkoutSession.
- Based on
CommandResult, correct response will be printed to user.
All description, warnings and response will be handled by CommonUi to ensure consistence across the app.
The sequence diagram below summarizes how the search command works:
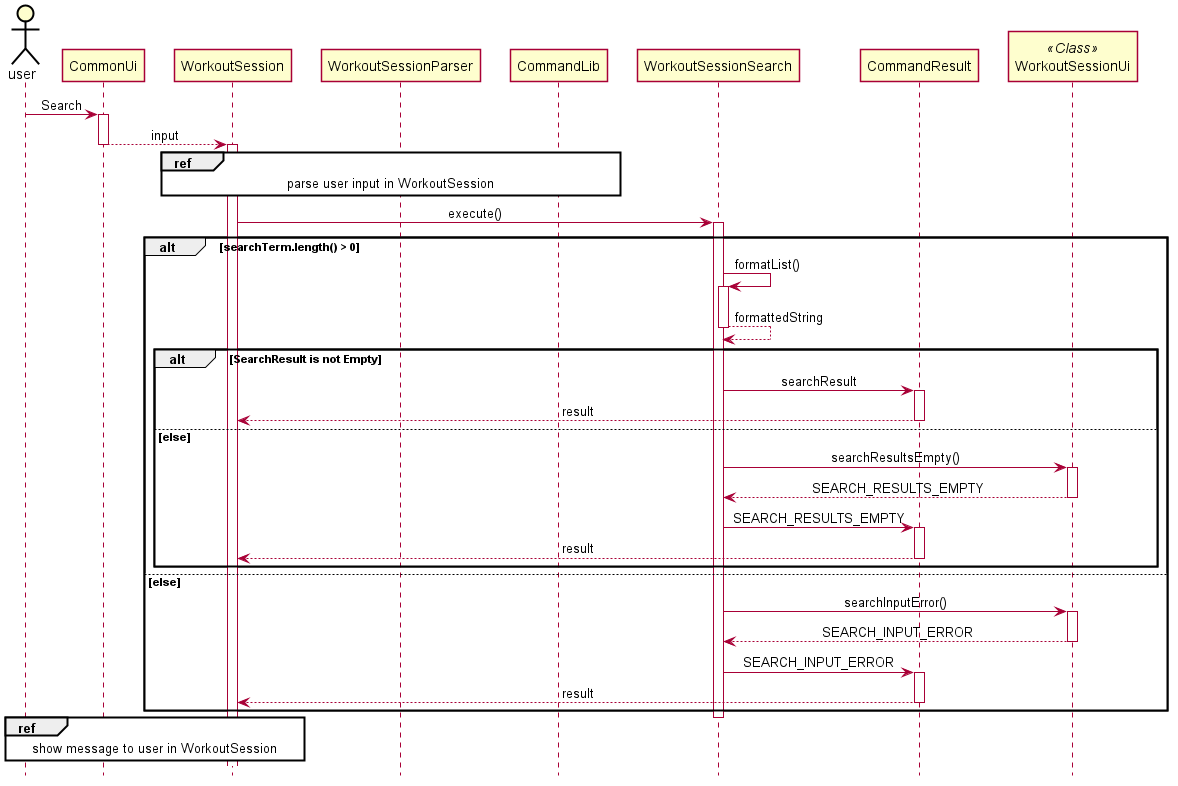
Design considerations Aspects: Length of results
-
Alternative 1 (current choice): Make the length for displaying exercise dynamic
- Pros: The table would look more appealing as the spacing would be dynamic.
- Cons: It is a lot more difficult to code.
-
Alternative 2: Make the length allocated for exercise really long
- Pros: The code would be simpler.
- Cons: The table would look ugly for the user to look at.
4.4.2. Listing Past Workout Sessions
The feature to list workoutSessions allows the user to view a summary of all the history workout sessions, including their index, creation date and tags.
Implementation When the user attempts to list workoutSessions, the WorkoutManger, WorkoutManagerParse, ListWS and WorkoutManagerStorage class will be called upon. The following sequence of steps will then occur:
- User executes
list /s 20201010 /e 20201025WorkoutManagercallsUi.getUserCommand()to receive user input.WorkoutManagercallsWorkoutManagerParser.parseinto a string array
- Creation of command object.
- Based on the parsed input,
WorkoutManagercallsCommandLibto return the correct Command ObjectListWS.
- Based on the parsed input,
- Executing Command
WorkoutManagercallsListWS.execute()to execute the commandListWScallsPastRecordList.list()PastRecordListwill return formatted list.WorkoutManagerreturns aCommandResultwhich contains the formatted list and execution result.
- Based on
CommandResult, correct response will be printed to user.
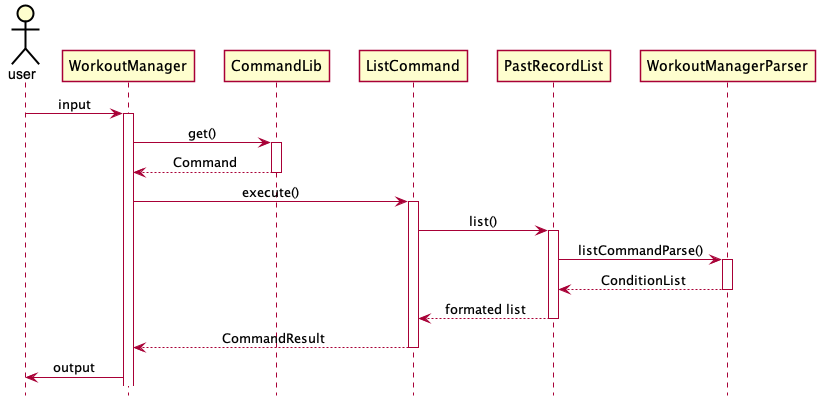
Design considerations Aspects: Security of stored data
-
Alternative 1 (current choice): call public methods of Storage class to print the list
- Pros: pastRecord are private and it can only be manipulated through designed public methods. Only selected data will be printed and viewed.
- Cons: Most methods Storage needs to be a static.
-
Alternative 2: Storage return a readonly list of pastRecord.
- Pros: More versatile operations can be done.
- Cons: All data of pastRecord will be exposed.
4.4.3. Editing Workout Session
User can anytime go back to edit a workout session created in the past such as adding or removing exercies in that session.
Each past workout session is stored in a different file name following its creation time. The meta information of these past records such as file name, creation time are stored in another file which will be loaded as the program initlises. The actual workout session record will only be loaded if needed e.g. when editting is called.
Implementation When the user attempts to edit a past workout session, the Ui, WorkoutManagerParser, CommandLib and WorkoutStorage class will be accessed and the following sequence of actions are called.
- User executes
edit 1WorkoutManagercallsUi.getUserCommand()to receive user input.WorkoutManagercallsWorkoutManagerParser.parseinto a string array
- Creation of command object.
- Based on the parsed input,
WorkoutManagercallsCommandLibto return the correct Command ObjectEditWS.
- Based on the parsed input,
- Executing Command
WorkoutManagercallsEditWS.execute()with the rest of parsed input.EditWScallsPastRecordList.edit()to locate the file. If the does not exist, the action is aborted. Else,PastRecordListupdates the meta information of the file and write to local workoutSessionStorage. The file path will be returned.EditWScreates a newWorkoutSessionObject with the file path.WorkoutSessionis initilised by loading the data in the file.EditWScallsworkoutSession.workoutSessionStart()so that user start editing this session.- After user exits this workout,
WorkoutManagerreturns aCommandResult.
- Based on
CommandResult, correct response will be printed to user.
All description, warnings and response will be handled by Ui to ensure consistence across the app.
The following sequence diagram shows how the new command works
The sequence diagram below summarizes how editting past record works:
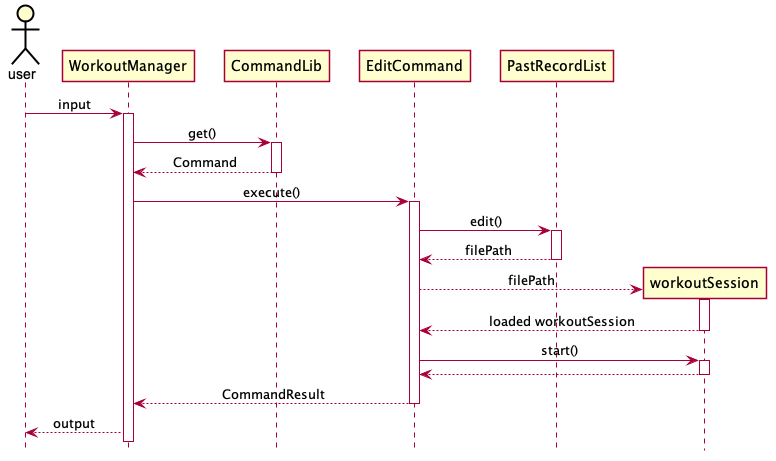 Design considerations
Past record workoutSessionStorage and model design:
-
Alternative 1 (current choice): store past workout sessions in different files and their meta information in a separate file
- Pros: Initialization will be faster as data loaded grows little even in long terms.
- Cons: Deleting files and creating files need to handle file names carefully.
-
Alternative 2: Load all past records during initialization.
- Pros: Run time can retrieve data faster as there is no need to access data in hard disk.
- Cons: The application initialization will grow quickly as the application scales.
4.4.4. Deleting a workout Session
User can delete a workout session created in the past by giving its index.
Each past workout session is stored in a different file name following its creation time. The meta information of these past records such as file name, creation time are stored in another file which will be loaded as the program initlises. When the user tries to delete a file, the application refers to the meta information of the file to locate the file and delete it. Then the meta information of the record will be deleted.
User can clear all data by iteratively delete the record until the meta data file is empty. To simplify that, user can use clear command to achieve that.
Implementation
When the user attempts to delete a past workout session, the Ui, WorkoutManagerParser, CommandLib and WorkoutStorage class will be accessed and the following sequence of actions are called.
- User executes
delete 1orclearWorkoutManagercallsUi.getUserCommand()to receive user input.WorkoutManagercallsWorkoutManagerParser.parseinto a string array
- Creation of command object.
- Based on the parsed input,
WorkoutManagercallsCommandLibto return the correct Command ObjectDeleteWSorclearWS.
- Based on the parsed input,
- Executing Command
WorkoutManagercallsDeleteWS.execute()with the rest of parsed input.DeleteWScallsPastRecorList.delete()to locate the file. If the does not exist, the action is aborted. Else,PastRecorListremove the meta information of the file and delete the local workoutSessionStorage file.- After user exits this workout,
WorkoutManagerreturns aCommandResult.
- Based on
CommandResult, correct response will be printed to user.
All description, warnings and response will be handled by Ui to ensure consistence across the app.
The sequence diagram below summarizes how deleting past record works:
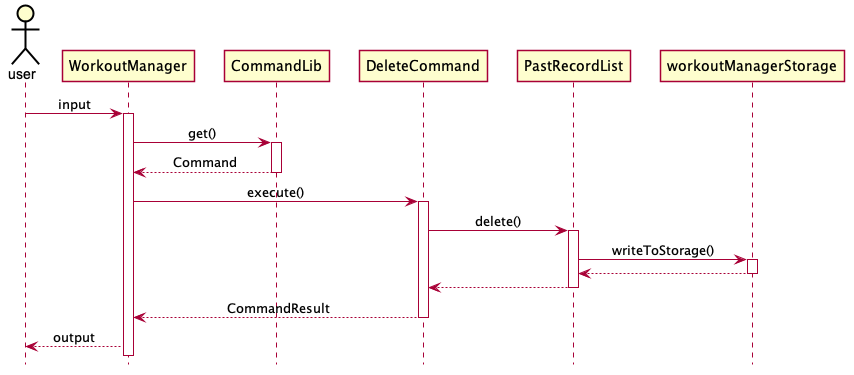
Design considerations
-
Alternative 1 (current choice): Delete
workoutSessionby specifying index of it.- Pros: Quick and easy deletion by using ArrayList.get().
- Cons: Lesser alternatives for the user and user would have to identify the index first by executing
listto get index of the session to be deleted.
-
Alternative 2: Delete
workoutSessionby specifyingworkoutSessiontags or dates.- Pros: More alternatives for users. Can bulk delete files with certain attributes.
- Cons: Tags and dates does not uniquely identify the record hence may result in accidental wrong deletion.
4.4.5. Searching Based on Conditions
The feature search allows the user to view a summary of all the history
workout sessions which satisfies certain conditions.
The user can search by the date of creation, or the tags that the session has. User can put in 0 or 1 or 2 criteria during search.
The user can attach variable number of tags after /t and one date after /d. The date must be specified in certain formats for it to be recognisable. Else, it will be treated as there is no date criteria given.
See here for all supported formats.
The tag criterion selects sessions which contains all the tags that the user specified in the search. The date criterion selects the sessions which is created on that date. Only sessions that satisfies all conditions will be selected and displayed.
The result is displayed in a table with the index of the selected records so that users can easily do further operations on them, e.g. delete or edit.
Implementation
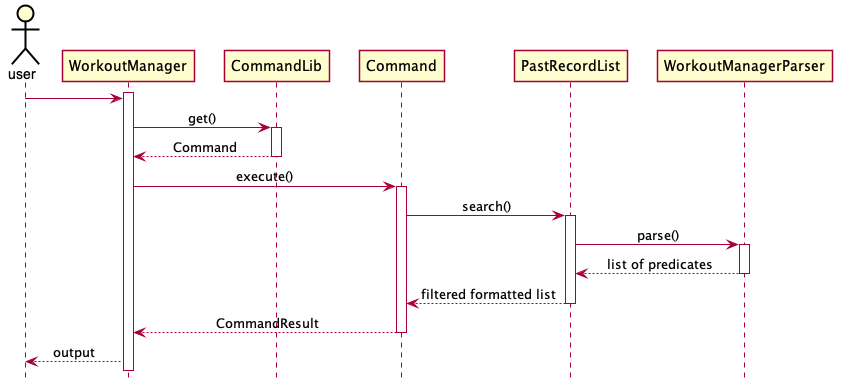
When the user attempts to list workoutSessions, the WorkoutManger, DeleteWS, WorkoutManagerStorage and WorkoutManagerParse class will be called upon. The following sequence of steps will then occur:
- User executes
search /t leg /d 20201017WorkoutManagercallsUi.getUserCommand()to receive user input.WorkoutManagercallsWorkoutManagerParser.parseinto a string array
- Creation of command object.
- Based on the parsed input,
WorkoutManagercallsCommandLibto return the correct Command ObjectSearchWS.
- Based on the parsed input,
- Executing Command
WorkoutManagercallsSearchWS.execute()to execute the commandSearchWScallsPastRecorList.search()PastRecordListwill callWorkoutManagerParser.parseto parse the arguments into an array of predicatesPastRecordListfilters the pastRecord arraylist and return a string representation of the filtered records toWorkoutManagerWorkoutManagerreturns aCommandResult.
- Based on
CommandResult, correct response will be printed to user.
The sequence diagram below summarizes how searching record works:
 Design considerations
Aspects: indexing the selected results
The index of a record is not stored in the schema because it easily varies with addition and deletion. Thus given a record, searching for its index will have higher time complexity.
-
Alternative 1 (current choice): print out the actual index of the record in the meta info file.
- Pros: The index is useful for user to use for future actions.
- Cons: Checking for the actual location complicates the search time complexity.
-
Alternative 2: print out the index of the element in the result list.
- Pros: Easy to implement. Low time complexity.
- Cons: Since the index in result list is not the same as the index in actual record meta, user cannot use the index for further actions.
4.5. Logging
Logging in the application refers to storing exceptions, warnings and messages that occur during the execution of Kitchen Helper. It was included to help developers to identify bugs and to simplify their debugging process.
The java.util.logging package in Java is used for logging. The logging mechanism can be managed from the SchwarzeneggerLogger class through the logger attribute.
All controls of the logger for the application can be viewed/ altered in the class construction. The current settings for the logger are as follow:
- All information is logged into a log file,
SchwarzeneggerLogs.log. - Logging is made to be displayed in the
SimpleFormatterstyle where the date, class and error description are recorded.
Logging Levels:
Level.SEVERE: a serious failure, which prevents normal execution of the program, for end users and system administrators.Level.WARNING: a potential problem, for end users and system administrators.Level.INFO: reasonably significant informational message for end users and system administrators.Level.CONFIG: hardware configuration, such as CPU type.Level.FINE,Level.FINER,Level.FINEST: three levels used for providing tracing information for the software developers.
SchwarzeneggerLogger follows singleton design pattern. Thus, other classes can access the logger by calling SchwarzeneggerLogger.getInstanceLogger(), and logging can be done by invoking the function log(). This will ensure that all loggings will be made to the same file across the various classes.
An example is shown below:
private static Logger logger = SchwarzeneggerLogger.getInstanceLogger();
logger.log(Level.WARNING, DESCRIPTION_OF_WARNING, e.toString());
5. Testing
5.1. Running Tests
There are two ways to run tests for The Schwarzenegger.
Method 1: Using IntelliJ JUnit test runner
- To run all tests, right-click on the
src/test/javafolder and chooseRun 'All Tests'. - To run a subset of tests, you can right-click on a test package, test class, or a test and choose
Run 'ABC'.
Method 2: Using Gradle
- To run all tests, open a console and run the command
gradlew clean test(MacOS/Linux:./gradlew clean test)
Note: If you are new to Gradle, refer to this Gradle Tutorial to get more tips on how to use Gradle commands.
5.2. Types of Tests
We have use types of tests:
-
Unit tests targeting the lowest level methods/classes.
e.g. profile.UtilsTest -
Integration tests that are checking the integration of multiple code units (those code units are assumed to be working). e.g. logic.commands.workout.workoutsession.WorkoutSessionAddTest
-
Hybrids of unit and integration tests. These test are checking multiple code units as well as how they are connected together. e.g. profile.ProfileSessionTest
6. Dev Ops
6.1. Build Automation
We use Gradle for tasks related to build automation, such as running tests, and checking code for style compliance.
To run all build-related tasks:
- Open a terminal in the project’s root directory.
- Run the command:
- Windows:
gradlew build - MacOS/Linux:
./gradlew build
- Windows:
- A message stating
BUILD SUCCESSFULwill be shown in the terminal if all tasks run successfully.
Otherwise, use the error report provided to resolve the issue before trying again.
6.2. Continuous Integration
We use Github Actions for continuous integration. No setup will be required for users who fork from the main The Schwarzenegger repository.
Whenever you create a pull request to the main repository for The Schwarzenegger:
- Various checks will automatically be executed on your pull request.
- If any checks fail, click on it to view the cause of the error, and fix it in your branch before pushing it again.
- Ensure that all checks pass before merging your pull request.
6.3. Coverage Report
We use the IntelliJ IDEA’s coverage analysis tool for coverage reporting. A tutorial on how to install and use this tool can be found here.
6.4. Making a Release
You can follow the steps below to make a new release:
- Generate the JAR file using Gradle by opening a terminal in the project’s root directory, and run the command:
- Windows:
gradlew clean shadowJar - MacOS/Linux:
./gradlew clean shadowJar
- Windows:
- Find the JAR file in the
build/libsdirectory. - Tag the repository with the new version number (e.g.
v2.1). - Create a new release using Github and upload the JAR file found in step 3.
6.5. Managing Dependencies
Currently, the Gson library is being used for JSON parsing, and the Apache Commons Lang for being used for string processing in The Schwarzenegger. Below are 2 ways to manage these dependencies.
- Use Gradle to manage and automatically download dependencies (Recommended).
- Manually download and include those libraries in the repo (this requires extra work and bloats the repo size).
Appendices
Appendix A: Product Scope
Target user profile:
- Can type fast.
- Is comfortable with using command line interface.
- Gyms regularly
- Keeps track of their diet.
Value Proposition:
- Manages workout and diet faster with greater efficiency than a typical GUI based fitness manager application.
- Gives users health advice based on their calorie intake of the day and weight expectation.
Appendix B: User Stories
| Priority | Version | As a … | I want to … | So that I can … |
|---|---|---|---|---|
HIGH |
v1.0 | New user | View the available commands easily | Learn more about the product before I use it |
HIGH |
v1.0 | New user | Create a user profile | Add a new profile to store my data |
HIGH |
v1.0 | User | View my profile in the database | Reference my added data and know my fitness classification |
HIGH |
v1.0 | User | Save my profile into the database | Retrieve it in subsequent launches of the app |
HIGH |
v1.0 | User | Load my profile from the database at the start of the app | view my added user profile |
HIGH |
v1.0 | User | Delete my profile from the database | Correct accidental typos |
HIGH |
v1.0 | User | Create a new workout session | Start a recorded workout session |
HIGH |
v1.0 | User | Add moves into a workout session | Personalise and record moves in each workout session |
HIGH |
v1.0 | User | Delete workout session record | Correct accidental typos |
HIGH |
v1.0 | User | End my current workout session | Be sure that my workout has ended |
HIGH |
v1.0 | User | Check my current workout session record | Do my workout and keep track of everything easily |
HIGH |
v1.0 | User | List out all my past diet session records | Check what I have eaten in the past |
HIGH |
v1.0 | User | Create a diet session with date and tags | Identify when I ate which meal |
HIGH |
v1.0 | User | Add different kinds of food into my diet | Keep track fo what I eat |
HIGH |
v1.0 | User | Save my diet records | View it next time |
MEDIUM |
v1.0 | User | Edit user profile | Change my data if something changes |
MEDIUM |
v2.0 | User | Clear all my diet sessions | Clear memory space on my storage to store new things |
MEDIUM |
v2.0 | User | Clear all my workout session records | Clear all past redundant data |
LOW |
v2.0 | User | Search for past workout sessions | Easily filter through the data that I don’t need |
LOW |
v2.0 | User | Search for my past diet sessions | See whether I have been eating properly lately |
LOW |
v2.1 | User | View how much more I need to eat in a day | plan my later meals easier |
LOW |
v2.1 | User | Get recommendation on my weight expectation | Adjust accordingly to achieve the Normal Weight BMI classification |
Appendix C: Non-Functional Requirements
Below are the non-functional requirements of The Schwarzenegger:
- Should work on any mainstream OS as long as it has Java
11or above installed. - A user with above average typing speed for regular English text (i.e. not code, not system admin commands) should be able to accomplish most of the tasks faster using commands than a program that uses the mouse.
- Should not require user to install program file.
- Should work for single user.
- Should be able to run without internet connection.
Appendix D: Glossary
- Mainstream OS - Windows, Linux, Unix, MacOS
Appendix E: Supported Formats of Date Input
Here shows all 12 valid formats.
`yyyyMMdd HH:mm`
`yyyy-MM-dd HH:mm`
`yyyy MM dd HH:mm`

`yyyyMMdd HHmm`
`yyyy-MM-dd HHmm`
`yyyy MM dd HHmm`

`yyyyMMdd`
`yyyy-MM-dd`
`yyyy MM dd`

`dd MM yyyy`
`ddMMyyyy`
`dd-MM-yyyy`
